Tropical Ocean Cake Ideas
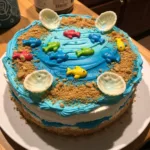
A delightful Tropical Ocean Cake recipe inspired by beach vacations, designed to bring tropical magic into your kitchen. This surprisingly simple yet stunning dessert features edible 'sand' and candy fish swimming in blue frosting, perfect for birthdays, summer parties, or a fun family treat that engages kids and creates lasting memories.
- Prep Time: 45 minutes
- Cook Time: 30 minutes
- Total Time: 4 hours
- Yield: 12 servings 1x
- Category: Dessert
- Method: Baking
- Cuisine: American
- Diet: Vegetarian
Ingredients
2 ½ cups All-purpose flour
1 ¾ cups Granulated sugar
1 tablespoon Baking powder
½ teaspoon Salt
¾ cup Unsalted butter (softened)
3 Large eggs
1 cup Whole milk
1 cup Unsalted butter (softened)
4 cups Powdered sugar (sifted)
2 teaspoons Vanilla extract
3–4 tablespoons Heavy cream or milk
A few drops Blue gel food coloring (various shades)
A tiny drop Green gel food coloring (Optional)
1 cup Graham crackers (crushed)
As desired Assorted candy fish/gummy sharks
Optional White chocolate shells/starfish
Instructions
- Preheat your oven to 350°F (175°C). Lightly grease and flour two 8-inch round cake pans. Alternatively, line the bottoms with parchment paper
- In a large bowl, whisk together the all-purpose flour, granulated sugar, baking powder, and salt. Make sure it's all thoroughly combined
- In a separate, medium bowl, cream the softened butter with a hand mixer or stand mixer until light and fluffy (2-3 minutes). Next, beat in the eggs one at a time, ensuring each is fully incorporated before adding the next. Scrape down the sides of the bowl as needed
- Gradually add the dry ingredients to the butter mixture, alternating with the milk. Start and end with the dry ingredients. Mix on low speed until just combined. Be careful not to overmix
- Divide the batter evenly between your two prepared cake pans. Smooth the tops with a spatula. Bake for 28-32 minutes, or until a wooden skewer inserted into the center comes out clea
- Once baked, remove the cakes from the oven and let them cool in their pans on a wire rack for about 10-15 minutes. Then, invert them onto the wire rack to cool completely
- While the cakes cool, prepare your ocean buttercream. In a large bowl, beat the softened butter until creamy. Gradually add the sifted powdered sugar, alternating with the heavy cream or milk, until smooth and fluffy. Beat in the vanilla extract
- Divide the buttercream into 3-4 bowls. Leave one bowl white. In the others, add varying amounts of blue gel food coloring (and optionally a tiny bit of green) to create different shades of blue. Mix thoroughly
- Place graham crackers in a Ziploc bag and crush them into fine crumbs. This creates your 'sand.'
- Once the cakes are completely cool, place one cake layer on your serving plate or cake stand. Spread a thin layer of white or light blue buttercream on top. Place the second cake layer on top
- Apply your different shades of blue buttercream in swatches around the sides and top of the cake. Use an offset spatula or a small knife to gently blend the colors together, creating a beautiful, wavy ocean effect
- Press the crushed graham crackers onto one side of the top of the cake, creating a 'beach' area
- Arrange your candy fish, gummy sharks, white chocolate shells, and starfish on the 'ocean' and 'beach' areas of your cake
- For best results, chill the cake for at least 30 minutes before slicing and serving
Notes
Room Temperature Ingredients: Ensure your butter, eggs, and milk are at room temperature. This helps them emulsify properly, creating a smoother, more uniform batter and a lighter, fluffier cake texture.
Don't Overmix: When combining your wet and dry ingredients, mix just until no streaks of flour remain. Overmixing develops the gluten in the flour, leading to a tough, dense cake.
Sift Your Powdered Sugar: For the silkiest, lump-free buttercream, always sift your powdered sugar.
Gel Food Coloring is Best: For vibrant, rich ocean colors without adding too much liquid to your frosting, always use gel food coloring.
Crumb Coat: For a perfectly smooth finish, apply a thin 'crumb coat' of frosting to the entire cake after layering. Chill the cake for 15-20 minutes, then apply your final, thicker layer of buttercream.
Use an Offset Spatula: An offset spatula is your best friend for frosting cakes. Its angled blade makes it easy to spread frosting smoothly and evenly.
Patience with Cooling: Resist the urge to frost a warm cake! Your buttercream will melt and slide right off. Allow your cake layers to cool completely, even chill them for 15 minutes in the fridge after cooling on the rack, before applying frosting.
Get Creative with Decorations: Don't limit yourself to just candy fish. Think about white chocolate molded into shells, crushed blue rock candy for shimmering water, or even some fresh fruit like kiwi slices arranged as lily pads.
Storage at Room Temperature: If your kitchen is cool (below 70°F or 21°C) and the cake contains no perishable fillings, you can store it loosely covered at room temperature for up to 2 days.
Storage in Refrigeration: For longer storage, or if your home is warmer, cover the cake with a cake dome or plastic wrap and refrigerate for up to 5 days. Bring to room temperature for about 30 minutes to an hour before serving for the best texture and flavor.
Freezing Unfrosted Layers: You can freeze unfrosted cake layers wrapped tightly in plastic wrap and then foil for up to 2 months. Thaw them in the refrigerator overnight before frosting.
Freezing Frosted Cake: For a frosted cake, flash freeze it uncovered until the frosting is firm (about 1-2 hours), then wrap it tightly in plastic wrap and foil. It will keep for about 1 month. Thaw in the refrigerator, then let it come to room temperature before serving.
Reheating (Cake Layers Only): While you wouldn't reheat a frosted cake, individual unfrosted slices can be gently warmed in the microwave for 10-15 seconds for a just-baked feel.
Nutrition
- Serving Size: 1 serving
- Calories: 475 kcal
- Sugar: 42.5 g
- Sodium: 225 mg
- Fat: 27.5 g
- Saturated Fat: 16.5 g
- Carbohydrates: 57.5 g
- Fiber: 1.5 g
- Protein: 4.5 g
- Cholesterol: 85 mg
Find it online: https://fabiloustaste.com/tropical-ocean-cake-ideas/