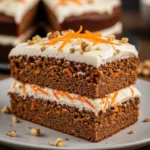
gluten free carrot cake
The scent of cinnamon and nutmeg always transports me back to my grandmother’s kitchen. She had a way of making every gathering feel special, and her carrot cake was legendary. When my eldest, Leo, was diagnosed with celiac disease a few years ago, I feared those cherished traditions might be lost. But food, for me, is love, and I was determined to keep those flavors alive, adapting them for his needs. After many attempts, countless tweaks, and a few crumbly disasters, I finally perfected what I proudly call the best gluten free carrot cake recipe. It’s rich, moist, spiced just right, and honestly, no one ever guesses it's gluten-free. This isn't just a recipe; it’s a piece of our family history, reimagined. I promise, making this incredible gluten free carrot cake will bring joy to your kitchen and smiles to everyone lucky enough to try a slice. It’s simple, nourishing, and utterly delicious.
- Prep Time: 30 mins
- Cook Time: 35 mins
- Total Time: 65 mins
- Yield: 12 servings 1x
- Category: Dessert
- Method: Baking
- Cuisine: American
- Diet: Gluten Free
Ingredients
2 cups Gluten-Free All-Purpose Flour Blend
1.5 cups Granulated Sugar
2 teaspoons Baking Soda
2 teaspoons Ground Cinnamo
0.5 teaspoon Ground Nutmeg
4 Large Eggs
1 cup Vegetable Oil
2 teaspoons Vanilla Extract
3 cups Grated Carrots
8 oz Cream Cheese
0.5 cup Unsalted Butter
4 cups Powdered Sugar
1 teaspoon Vanilla Extract
Instructions
- Preheat your oven to 350°F (175°C). Grease and flour two 9-inch round cake pans with gluten-free flour. You can also line the bottoms with parchment paper for easier release
- In a large mixing bowl, whisk together the gluten-free all-purpose flour blend, granulated sugar, baking soda, ground cinnamon, and ground nutmeg. Make sure there are no lumps
- In a separate medium bowl, whisk the eggs, vegetable oil, and vanilla extract until well combined
- Pour the wet ingredients into the dry ingredients. Mix on low speed with an electric mixer, or by hand with a spatula, just until combined. Avoid overmixing
- Gently fold in the grated carrots until evenly distributed throughout the batter. If you are adding nuts or raisins, fold them in now too
- Divide the batter evenly between the two prepared cake pans. Smooth the tops with a spatula. Bake for 30-35 minutes, or until a wooden skewer inserted into the center of the cakes comes out clea
- Remove the cakes from the oven and let them cool in the pans for 10-15 minutes. Then, carefully invert them onto a wire rack to cool completely. Do not try to frost warm cakes, as the frosting will melt
- While the cakes cool, prepare the cream cheese frosting. In a large bowl, using an electric mixer, beat the softened cream cheese and softened unsalted butter until light and fluffy. Gradually add the powdered sugar, one cup at a time, beating well after each addition until smooth. Finally, beat in the vanilla extract
- Once the cakes are completely cool, place one layer on your serving plate. Spread about one-third of the cream cheese frosting evenly over the top. Carefully place the second cake layer on top. Use the remaining frosting to cover the top and sides of the entire cake. Decorate with extra grated carrot, chopped nuts, or edible flowers if desired. Slice and enjoy your homemade gluten free carrot cake!
Notes
Measure Your Flour Correctly: Scoop your gluten-free flour blend into the measuring cup, then level it off with a straight edge. Do not pack it down. Too much flour results in a dry cake.
Finely Grate Carrots: Use the small holes on your box grater or a food processor with a grating attachment to finely shred the carrots. Smaller pieces distribute more evenly, provide moisture, and almost melt into the cake, creating a smoother texture.
Room Temperature Ingredients for Frosting: Ensure your cream cheese and butter are softened to room temperature for the frosting. This allows them to combine smoothly, creating a light, fluffy, and lump-free cream cheese frosting. Cold ingredients will result in a clumpy frosting that is difficult to spread.
Do Not Overmix: After combining wet and dry ingredients, mix just until no streaks of dry flour remain. Overmixing develops any gluten present in the flour blend, leading to a tougher, denser cake.
Cool Completely Before Frosting: Frosting a warm cake will cause the frosting to melt and slide right off. Allow your cake layers to cool completely on a wire rack, which can take a couple of hours.
Parchment Paper is Your Friend: Line the bottoms of your cake pans with parchment paper after greasing. This extra step guarantees easy release and prevents your cake layers from sticking.
Even Layers for Baking: Divide your batter as evenly as possible between the two cake pans. Use a kitchen scale if you want to be precise. Even layers ensure both cakes bake uniformly and finish at the same time.
Test for Doneness: A simple wooden skewer or toothpick inserted into the center of the cake should come out clean when the cake is done. Avoid overbaking.
Refrigeration is Key: Due to the cream cheese frosting, this cake must be stored in the refrigerator. Cover it tightly with plastic wrap or place it in an airtight cake carrier.
Shelf Life: When stored properly in the refrigerator, your cake will remain fresh for up to 3-4 days.
Freezing Unfrosted Cake Layers: Bake the cake layers and let them cool completely. Wrap each unfrosted layer individually in plastic wrap, then an additional layer of aluminum foil. Freeze for up to 2 months. Thaw frozen layers in the refrigerator overnight before frosting.
Freezing Frosted Cake (Optional): Flash freeze individual slices on a baking sheet until the frosting is firm (about 1-2 hours). Then, wrap each slice tightly in plastic wrap and foil. For a whole cake, flash freeze, then wrap. Lasts about 1 month.
Reheating (Thawing) Tips: To serve frozen cake, remove from freezer and let it thaw in the refrigerator overnight, or at room temperature for a few hours.
Serving Temperature: For the best flavor and texture, allow your refrigerated cake to sit at room temperature for about 30 minutes before serving.
Nutrition
- Serving Size: 1 slice
- Calories: 450 kcal
- Sugar: 38g
- Sodium: 310mg
- Fat: 28g
- Saturated Fat: 10g
- Carbohydrates: 48g
- Fiber: 2g
- Protein: 4g
- Cholesterol: 85mg
Find it online: https://fabiloustaste.com/gluten-free-carrot-cake/