Aesthetic Cake Designs Collection
This collection empowers you to create show-stopping aesthetic cake designs in your own kitchen without professional training. It focuses on simple techniques with maximum impact, ensuring success and bringing beauty and love to your table, turning any occasion into a celebration. Discover the joy of crafting visually stunning cakes that impress everyone.
- Prep Time: 1 hour 30 mins
- Cook Time: 30 mins
- Total Time: 4 hours 30 mins
- Yield: 12 servings 1x
- Category: Dessert
- Method: Baking
- Cuisine: American
- Diet: Vegetarian
Ingredients
2.5 cups All-purpose flour
1.75 cups Granulated sugar
1 tablespoon Baking powder
0.5 teaspoon Salt
0.75 cup Unsalted butter (softened)
4 Large eggs
1 cup Whole milk
2 teaspoons Vanilla extract
1.5 cups Unsalted butter (softened)
5.5 cups Powdered sugar (sifted)
3.5 tablespoons Heavy cream or milk
1 teaspoon Vanilla extract
Pinch salt
As needed Food coloring (gel preferred)
Small bunch Edible flowers (organic, pesticide-free)
0.5 cup Fresh berries or fruit slices
2 tablespoons Sprinkles (various shapes/colors)
0.25 cup Chocolate ganache or melted chocolate
Instructions
- Preheat your oven to 350°F (175°C). Grease and flour three 8-inch round cake pans. Line the bottoms with parchment paper
- In a large bowl, whisk together the flour, sugar, baking powder, and salt. Make sure they are well combined
- In a separate large bowl, beat the softened butter with an electric mixer until light and fluffy. Gradually add the eggs one at a time, beating well after each addition. Scrape down the sides of the bowl as needed
- With the mixer on low speed, add about a third of the dry ingredients to the butter mixture, mixing until just combined. Next, pour in half of the milk and vanilla extract, mixing gently. Repeat this process, ending with the dry ingredients. Do not overmix
- Divide the batter evenly among the prepared cake pans. Bake for 25-30 minutes, or until a wooden skewer inserted into the center comes out clea
- Let the cakes cool in the pans for 10 minutes. Then, invert them onto a wire rack to cool completely
- While the cakes cool, prepare your frosting. Beat the softened butter in a large bowl until creamy. Gradually add the sifted powdered sugar, alternating with splashes of heavy cream or milk and vanilla extract. Beat until light, fluffy, and smooth. Add a pinch of salt. Adjust consistency with more powdered sugar (for thicker) or cream (for thinner)
- Once cooled, use a serrated knife to level the tops of your cake layers, creating flat surfaces
- Place one cake layer on your serving plate or cake stand. Spread a thin layer of buttercream over the top. Add the second layer, more buttercream, and then the third layer. Apply a very thin layer of frosting all over the entire cake for a "crumb coat". Chill the cake in the refrigerator for 20-30 minutes
- Once the crumb coat is firm, apply a thicker, even layer of frosting to the top and sides of the cake. Use an offset spatula or bench scraper to smooth the frosting
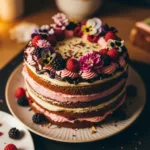
- Decorate the cake using your desired elements: arrange fresh edible flowers, place fresh berries in a pattern, spoon or pipe chocolate ganache for drips, create textured swirls with an offset spatula, apply sprinkles, or pipe simple borders, dots, or rosettes
- Chill the decorated cake for at least 30 minutes before serving
Notes
Always use room temperature butter and eggs for both cake batter and frosting to ensure smooth, emulsified results.
Sift flour and powdered sugar to remove lumps and achieve a lighter cake and smoother frosting.
Avoid overmixing cake batter to prevent gluten development, which can lead to a tough, dense cake.
A crumb coat is essential to trap loose crumbs and create a stable, smooth base for your final frosting layer.
For extra smooth frosting, use a bench scraper or offset spatula at a 45-degree angle, heating the tool briefly under hot water and wiping dry if needed.
Opt for gel food coloring for vibrant colors without altering frosting consistency.
Take your time with decorating; patience and careful placement make a significant difference in the final aesthetic.
For elegant designs, often less is more; do not overcrowd the cake with too many elements.
Use parchment paper strips tucked under the cake before frosting to catch drips and ensure clean edges on your cake board.
For short-term storage (under 24 hours), store the cake at cool room temperature (below 70°F/21°C) under a cake dome. For longer storage or cakes with perishable fillings/decorations, refrigerate in an airtight cake carrier or covered loosely with plastic wrap.
Always bring refrigerated cake to room temperature (1-2 hours) before serving for best flavor and texture.
Nutrition
- Serving Size: 1 slice
- Calories: 450 kcal
- Sugar: 40 g
- Sodium: 200 mg
- Fat: 25 g
- Saturated Fat: 15 g
- Unsaturated Fat: 9.5 g
- Trans Fat: 0.5 g
- Carbohydrates: 55 g
- Fiber: 1 g
- Protein: 5 g
- Cholesterol: 100 mg
Find it online: https://fabiloustaste.com/aesthetic-cake-designs-collection/