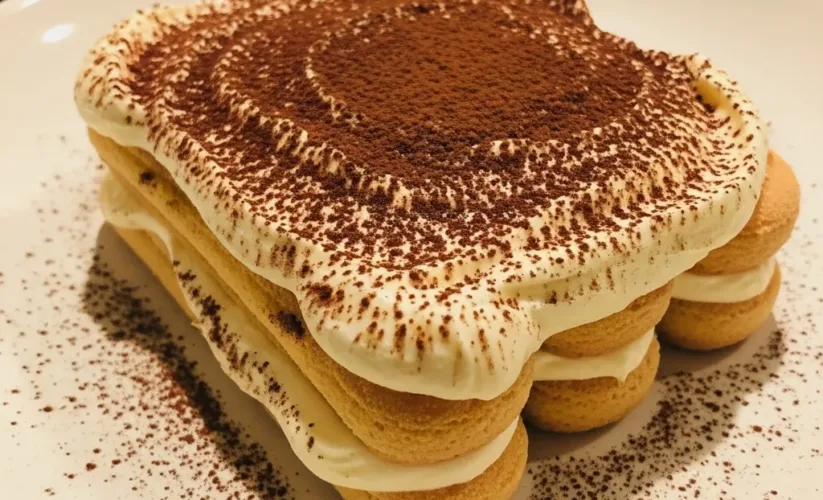
Gluten free tiramisu
There’s something truly magical about bringing a beautiful dessert to the table, especially one that gathers everyone around for that moment of pure joy and togetherness. For years, I watched my husband’s Aunt Sofia lovingly prepare her famous tiramisu, a masterpiece of creamy mascarpone and coffee-soaked ladyfingers. But as our family grew and dietary needs evolved – specifically, my youngest discovering a gluten sensitivity – those indulgent moments felt a little out of reach.
I remember thinking, “How can I capture that authentic Italian dessert experience when gluten is off the table?” That’s when I embarked on a mission: to create a gluten free tiramisu that tasted every bit as authentic, every bit as luxurious, as Aunt Sofia’s original.
And let me tell you, friends, after many joyful kitchen experiments, I finally cracked the code! This isn’t just a recipe; it’s a labor of love, a delicious compromise that means no one has to miss out on one of life’s greatest pleasures.
This gluten free tiramisu recipe brings all the classic flavors and textures you adore, making it the perfect dessert for any family gathering or a quiet treat for yourself. You’ll be amazed at how incredibly easy it is to make this delightful gluten free tiramisu right in your own kitchen.
Why You’ll Love This Gluten-Free Tiramisu Recipe
Oh, where do I even begin? This gluten free tiramisu is a showstopper, a crowd-pleaser, and a truly soul-satisfying dessert. First, it completely eliminates the guesswork of finding a delicious, safe option for those avoiding gluten.
You make it yourself, with love, knowing exactly what goes into every layer. Second, the taste is absolutely unparalleled. We’re talking about rich, velvety mascarpone cream, perfectly balanced with the bitter notes of strong coffee and a hint of sweet liqueur (or not, if you prefer!).
Each bite of this gluten free tiramisu offers that irresistible interplay of textures – the soft, coffee-infused gluten-free ladyfingers contrasting with the luscious cream. You won’t find a trace of that “gluten-free taste” often associated with alternative recipes; this tastes like the real deal, perhaps even better! It’s the kind of dessert that elicits gasps of delight and requests for seconds.
Plus, it’s surprisingly simple to put together, requiring no baking whatsoever. It’s perfect for making ahead, which is a lifesaver for busy moms like me. Trust me, once you make this gluten free tiramisu, it will become your go-to special occasion dessert.
Ingredients You’ll Need
Gathering your ingredients for this incredible gluten free tiramisu is the first step to pure bliss. Quality matters here, especially for your coffee and cocoa! You’ll want to choose the best you can find to really make those flavors sing.

| Ingredient | Quantity |
|---|---|
| Strong Brewed Coffee or Espresso (cooled) | 2 cups (about 470ml) |
| Granulated Sugar (for coffee) | 2 tablespoons |
| Marsala Wine or Coffee Liqueur (optional) | 1/4 cup (about 60ml) |
| Large Egg Yolks | 6 |
| Granulated Sugar (for cream) | 1/2 cup (100g) |
| Mascarpone Cheese (cold) | 24 ounces (680g) |
| Heavy Cream (cold) | 1 cup (240ml) |
| Vanilla Extract | 1 teaspoon |
| Gluten-Free Ladyfingers | Approx. 24-30 (2-3 packages, depending on size) |
| Unsweetened Cocoa Powder (for dusting) | 3-4 tablespoons |
Substitutions & Variations
One of the beautiful things about cooking is its flexibility, and this gluten free tiramisu recipe is no exception! You can easily adapt it to suit different tastes or dietary needs without sacrificing flavor.
- Gluten-Free Ladyfingers: Finding good quality gluten-free ladyfingers is key. Brands like Schär often make them, or you can check specialty grocery stores. If you’re feeling adventurous, you can even bake your own from a gluten-free sponge cake recipe, cutting them into finger shapes and drying them slightly. If ladyfingers are completely unavailable, a dense gluten-free vanilla cake or even gluten-free shortbread cookies can work in a pinch, though the texture will be different.
- Coffee: While espresso offers the most authentic flavor for your gluten free tiramisu, a strong brew from your regular coffee maker works perfectly. For a decaffeinated version, simply use decaf espresso or coffee. You can also experiment with flavored coffees, like hazelnut or caramel, for a fun twist.
- Alcohol: The Marsala wine or coffee liqueur adds a classic depth, but it’s completely optional. For an alcohol-free gluten free tiramisu, simply omit it and add an extra splash of coffee or a teaspoon of rum extract (without the alcohol). Almond extract can also add a lovely note.
- Dairy-Free: Yes, a dairy-free gluten free tiramisu is possible! You can use a combination of chilled full-fat coconut cream (the thick part from a can left in the fridge overnight) whipped with a dairy-free cream cheese alternative, or a store-bought vegan mascarpone substitute. Ensure your gluten-free ladyfingers are also dairy-free.
- Egg-Free: For an egg-free version, you can create a custard using cornstarch and plant-based milk, or whip aquafaba (the liquid from a can of chickpeas) with sugar to create a meringue-like base that you can fold into dairy-free cream cheese. This takes a little more experimentation but results in a fantastic egg-free gluten free tiramisu.
- Flavor Variations: Dust your finished gluten free tiramisu with grated dark chocolate along with or instead of cocoa. Add orange zest to the mascarpone cream for a bright, citrusy note. A sprinkle of cinnamon or cardamom in the coffee can also add a warm, exotic touch.
Embracing the adaptability of this dessert allows everyone to enjoy a classic without compromise, proving deliciousness knows no bounds. Continue exploring the fantastic tips and tricks within this very guide to perfect your own Gluten free tiramisu.
Step-by-Step Instructions
Making this incredible gluten free tiramisu is simpler than you might think! Follow these steps, and you’ll have a dessert that will impress everyone.
Note: This video is for demonstration purposes and may use a slightly different method.
- Prepare the Coffee Mixture: First, brew your strong coffee or espresso and let it cool completely. Stir in 2 tablespoons of granulated sugar until dissolved. If using, mix in the Marsala wine or coffee liqueur. Set aside in a shallow dish for dipping.
- Whisk the Egg Yolks and Sugar: In a large, heatproof bowl, combine the 6 egg yolks and 1/2 cup granulated sugar. Set the bowl over a saucepan of simmering water (make sure the bottom of the bowl doesn’t touch the water). Whisk continuously with an electric mixer on medium-high speed for about 7-10 minutes, or until the mixture is thick, pale yellow, and has doubled in volume. It should form ribbons when the whisk is lifted. This process cooks the eggs and creates a stable base for your cream. Remove from heat and let cool slightly.
- Prepare the Mascarpone Cream: In a separate large bowl, using an electric mixer, whip the cold heavy cream until soft peaks form. Be careful not to over-whip. In another bowl, gently whisk the cold mascarpone cheese until it’s smooth and slightly loosened. Do not overmix, or it will curdle.
- Combine the Creams: Gently fold the slightly cooled egg yolk mixture into the mascarpone cheese until just combined. Then, carefully fold in the whipped heavy cream and vanilla extract until the mixture is smooth and homogenous. Be gentle to maintain the airy texture. This is your luscious gluten free tiramisu cream!
- Assemble the Tiramisu: Find an 8×8 inch or 9×13 inch baking dish (depending on how many layers you prefer). Quickly dip each gluten-free ladyfinger into the cooled coffee mixture, one at a time, for just 1-2 seconds per side. Don’t over-soak, as gluten-free ladyfingers can absorb liquid very quickly and become mushy.
- Create the First Layer: Arrange a single layer of the dipped ladyfingers at the bottom of your baking dish, breaking them as needed to fit.
- Add Cream and Repeat: Spread half of the mascarpone cream evenly over the ladyfinger layer. Dust lightly with unsweetened cocoa powder using a sieve.
- Second Layer: Repeat with another layer of dipped gluten-free ladyfingers, followed by the remaining mascarpone cream.
- Chill Thoroughly: Cover the dish tightly with plastic wrap and refrigerate for at least 6 hours, or preferably overnight. Chilling is crucial for the flavors to meld and the tiramisu to set properly. This ensures your gluten free tiramisu holds its shape beautifully.
- Serve: Just before serving, dust the top generously with unsweetened cocoa powder. Slice and enjoy your homemade gluten free tiramisu!
Pro Tips for Success
Crafting the perfect gluten free tiramisu is an art, but with these simple pro tips, you’ll achieve perfection every time. These little tricks make a big difference in the final taste and texture of your irresistible gluten free tiramisu.

- Don’t Over-Soak Ladyfingers: This is perhaps the most critical tip, especially for gluten-free ladyfingers. They are often more delicate and porous than their traditional counterparts. A quick dip – just 1-2 seconds per side – is all they need. Too much time in the coffee mixture will lead to a soggy tiramisu, and nobody wants a mushy gluten free tiramisu.
- Quality Ingredients Matter: Use high-quality mascarpone cheese for the best creamy texture. A strong, freshly brewed espresso or coffee will provide the authentic, robust coffee flavor that defines a great gluten free tiramisu. Good quality cocoa powder also makes a noticeable difference for that final dusting.
- Chill, Chill, Chill: Patience is a virtue here. Allowing your gluten free tiramisu to chill for at least 6 hours, and ideally overnight, is non-negotiable. This chilling time allows the flavors to deepen and meld together beautifully, and it helps the dessert set firmly, making for clean slices.
- Whip Mascarpone Gently: Mascarpone is a delicate cheese. When you whisk it to smooth it out, do so gently and briefly. Over-whipping can cause it to curdle and become grainy, which would be a tragedy for your lovely gluten free tiramisu.
- Use Cold Ingredients for Cream: Ensure your heavy cream and mascarpone cheese are very cold when you start. This helps them whip up properly and achieve that luxurious, stable consistency for your gluten free tiramisu.
- Dust Just Before Serving: For the freshest look and best flavor, dust your gluten free tiramisu with cocoa powder right before you plan to serve it. This prevents the cocoa from absorbing moisture and clumping or looking damp.
- Cook Egg Yolks Properly: The zabaglione-like base created by whisking egg yolks and sugar over heat is essential for both flavor and safety. Make sure the mixture thickens and lightens in color, indicating the eggs are pasteurized and ready to form the base of your divine gluten free tiramisu cream.
Just as mastering the delicate balance of ladyfingers is key here, similar precision can elevate other sweet treats. If you’ve enjoyed perfecting this dessert, you might also love learning the secrets to light and fluffy Gluten free donuts.
Storage & Reheating Tips
This gluten free tiramisu is a dessert that truly benefits from a bit of time in the fridge, allowing the flavors to marry beautifully. Proper storage ensures every bite remains as delightful as the first.
- Refrigeration: Always store your gluten free tiramisu in an airtight container or covered tightly with plastic wrap in the refrigerator. This protects it from absorbing other food odors and keeps it fresh. It will stay wonderfully fresh for 3-4 days. In fact, many people find it tastes even better on the second and third day as the flavors develop further.
- Freezing (Not Recommended): While you technically *can* freeze tiramisu, I generally don’t recommend it, especially for this delicate gluten free tiramisu. The texture of the mascarpone cream can change significantly upon thawing, sometimes becoming a bit watery or grainy. The ladyfingers might also become too soft and mushy. If you absolutely must freeze it, do so without the final cocoa dusting, wrap it very tightly, and consume within 2-3 weeks. Thaw slowly in the refrigerator overnight.
- Serving Temperature: Tiramisu is best served chilled, straight from the refrigerator. This ensures the cream holds its shape and provides a refreshing contrast to the rich flavors. There’s no “reheating” involved with this cold dessert!
What to Serve With This Recipe
A glorious gluten free tiramisu deserves equally delightful accompaniments. While it shines brightly on its own, pairing it with the right beverage or a light side can elevate the entire experience. Here are some of my family’s favorite pairings:

- Espresso or Strong Coffee: The classic pairing! A small, strong espresso after a slice of gluten free tiramisu is tradition for a reason. The bitterness of the coffee perfectly cuts through the sweetness and richness of the dessert, preparing your palate for another blissful bite.
- Cappuccino or Latte: If you prefer a creamier coffee experience, a cappuccino or latte can also be a wonderful match. The milkiness complements the tiramisu without overpowering it.
- Dessert Wine: A sweet dessert wine, like a Moscato d’Asti or a Vin Santo, makes for an elegant pairing. Their light, fruity notes and sweetness harmonize beautifully with the flavors of this gluten free tiramisu.
- Amaretto or Limoncello: A small glass of an Italian liqueur like Amaretto (almond-flavored) or Limoncello (lemon-flavored) can be a lovely digestif to enjoy alongside or after your slice of gluten free tiramisu.
- Fresh Berries: For a touch of freshness and contrast, serve a small side of fresh, lightly sweetened berries (strawberries, raspberries, or blueberries). Their tartness provides a wonderful counterpoint to the creamy richness of the gluten free tiramisu.
- Simple Fruit Salad: A very light, not-too-sweet fruit salad can also be a refreshing companion, especially if you’re enjoying the tiramisu after a heavier meal.
While espresso is a traditional partner for tiramisu, sometimes a heartier, comforting breakfast treat is just what you need to start the day. For another truly satisfying gluten-free delight, consider trying these incredible Gluten free cinnamon rolls.
FAQs
Can I make this gluten free tiramisu ahead of time?
Absolutely! In fact, making your gluten free tiramisu ahead of time is highly recommended. It needs a minimum of 6 hours to chill and set, but chilling it overnight (12-24 hours) allows the flavors to deepen and meld beautifully, making it even more delicious. This is perfect for party planning, letting you focus on other dishes on the day of the event.
What kind of gluten-free ladyfingers should I use?
Look for commercially available gluten-free ladyfingers from brands like Schär or specific gluten-free bakeries. Ensure they are firm enough to dip without immediately falling apart but also porous enough to absorb the coffee. If you can’t find them, a dense gluten-free vanilla cake or even gluten-free shortbread cookies can be a substitute, though the texture of your gluten free tiramisu will vary slightly.
Is it possible to make this gluten free tiramisu alcohol-free?
Yes, absolutely! The alcohol (Marsala wine or coffee liqueur) in this gluten free tiramisu recipe is completely optional. You can simply omit it from the coffee dipping mixture.
If you want to add a hint of flavor, a teaspoon of vanilla extract or rum extract (without the alcohol) can be added to the coffee instead. The tiramisu will still be incredibly delicious and authentic-tasting.
How do I know when my mascarpone cream is whipped enough?
For the egg yolk mixture, you’ll know it’s ready when it’s pale yellow, thick, and has doubled in volume, forming ribbons when you lift the whisk. For the heavy cream, whip it until soft peaks form – meaning the peaks will hold their shape but still be somewhat floppy.
For the mascarpone itself, simply whisk it gently until it’s smooth and lump-free; do not over-whisk, as it can curdle easily. When combining everything for your gluten free tiramisu, fold gently to maintain airiness.
Can I use instant coffee for this gluten free tiramisu recipe?
While fresh espresso or strong brewed coffee yields the best flavor, you can use instant coffee as a last resort. Make sure to brew it extra strong, perhaps using less water than recommended, to ensure a robust coffee flavor that stands up to the richness of the mascarpone cream in your gluten free tiramisu. Avoid using weak or diluted coffee.
What if I don’t have an electric mixer for the mascarpone cream?
An electric mixer makes the process much easier and quicker, especially for whipping the egg yolks and heavy cream. However, you can make this gluten free tiramisu with a good old-fashioned whisk and some elbow grease! Be prepared for a bit of an arm workout, particularly when whisking the egg yolks over heat and whipping the heavy cream to soft peaks. The results will be just as delicious!
Gluten-free tiramisu adapts the beloved Italian dessert for those with dietary restrictions, primarily by substituting traditional ladyfingers with gluten-free alternatives. This ensures that the iconic layers of coffee-soaked sponge, rich mascarpone cream, and cocoa dusting can be enjoyed by everyone, maintaining the original’s luxurious taste and texture. The adaptation of traditional recipes to accommodate various dietary needs, like those requiring gluten-free diets, is a common practice in modern culinary arts.
Nutrition Information (per serving)
Please note that these values are estimates and can vary based on specific ingredient brands and preparation methods. This is an indulgent dessert, so enjoy your gluten free tiramisu in moderation!
| Nutrient | Amount (Estimate) |
|---|---|
| Calories | 450-550 kcal |
| Total Fat | 35-45 g |
| Saturated Fat | 20-25 g |
| Cholesterol | 200-250 mg |
| Sodium | 50-70 mg |
| Total Carbohydrates | 25-35 g |
| Dietary Fiber | 1-2 g |
| Total Sugars | 20-30 g |
| Protein | 5-8 g |
gluten free tiramisu

This gluten-free tiramisu recipe captures the authentic Italian dessert experience with creamy mascarpone and coffee-soaked gluten-free ladyfingers. It's a showstopper, crowd-pleaser, and soul-satisfying dessert that eliminates guesswork for those avoiding gluten, offering unparalleled taste and texture. It's surprisingly simple to put together, requires no baking, and is perfect for making ahead.
- Prep Time: 30 mins
- Cook Time: 10 mins
- Total Time: 40 mins
- Yield: 12 servings 1x
- Category: Dessert
- Method: No-Bake
- Cuisine: Italian
- Diet: Gluten Free
Ingredients
2 cups Strong Brewed Coffee or Espresso (cooled)
2 tablespoons Granulated Sugar (for coffee)
1/4 cup Marsala Wine or Coffee Liqueur (optional)
6 Large Egg Yolks
1/2 cup (100g) Granulated Sugar (for cream)
24 ounces (680g) Mascarpone Cheese (cold)
1 cup (240ml) Heavy Cream (cold)
1 teaspoon Vanilla Extract
Approx. 24-30 Gluten-Free Ladyfingers (2-3 packages, depending on size)
3–4 tablespoons Unsweetened Cocoa Powder (for dusting)
Instructions
- Prepare the Coffee Mixture: First, brew strong coffee or espresso and let it cool completely. Stir in 2 tablespoons of granulated sugar until dissolved. If using, mix in the Marsala wine or coffee liqueur. Set aside in a shallow dish for dipping
- Whisk the Egg Yolks and Sugar: In a large, heatproof bowl, combine the 6 egg yolks and 1/2 cup granulated sugar. Set the bowl over a saucepan of simmering water (make sure the bottom of the bowl doesn't touch the water). Whisk continuously with an electric mixer on medium-high speed for about 7-10 minutes, or until the mixture is thick, pale yellow, and has doubled in volume. It should form ribbons when the whisk is lifted. This process cooks the eggs and creates a stable base for your cream. Remove from heat and let cool slightly
- Prepare the Mascarpone Cream: In a separate large bowl, using an electric mixer, whip the cold heavy cream until soft peaks form. Be careful not to over-whip. In another bowl, gently whisk the cold mascarpone cheese until it’s smooth and slightly loosened. Do not overmix, or it will curdle
- Combine the Creams: Gently fold the slightly cooled egg yolk mixture into the mascarpone cheese until just combined. Then, carefully fold in the whipped heavy cream and vanilla extract until the mixture is smooth and homogenous. Be gentle to maintain the airy texture. This is your luscious gluten free tiramisu cream!
- Assemble the Tiramisu: Find an 8×8 inch or 9×13 inch baking dish. Quickly dip each gluten-free ladyfinger into the cooled coffee mixture, one at a time, for just 1-2 seconds per side. Don’t over-soak, as gluten-free ladyfingers can absorb liquid very quickly and become mushy
- Create the First Layer: Arrange a single layer of the dipped ladyfingers at the bottom of your baking dish, breaking them as needed to fit
- Add Cream and Repeat: Spread half of the mascarpone cream evenly over the ladyfinger layer. Dust lightly with unsweetened cocoa powder using a sieve
- Second Layer: Repeat with another layer of dipped gluten-free ladyfingers, followed by the remaining mascarpone cream
- Chill Thoroughly: Cover the dish tightly with plastic wrap and refrigerate for at least 6 hours, or preferably overnight. Chilling is crucial for the flavors to meld and the tiramisu to set properly. This ensures your gluten free tiramisu holds its shape beautifully
- Serve: Just before serving, dust the top generously with unsweetened cocoa powder. Slice and enjoy your homemade gluten free tiramisu!
Notes
Don't Over-Soak Ladyfingers: A quick dip (1-2 seconds per side) is all they need, especially for gluten-free varieties, to prevent sogginess.
Quality Ingredients Matter: Use high-quality mascarpone, strong freshly brewed coffee/espresso, and good cocoa powder for the best flavor and texture.
Chill, Chill, Chill: Patience is crucial. Allow at least 6 hours, ideally overnight, for chilling to deepen flavors and ensure the dessert sets firmly for clean slices.
Whip Mascarpone Gently: Whisk mascarpone briefly until smooth; over-whipping can cause it to curdle.
Use Cold Ingredients for Cream: Ensure heavy cream and mascarpone are very cold before whipping for proper consistency.
Dust Just Before Serving: For the freshest look and best flavor, dust with cocoa powder right before serving to prevent moisture absorption and clumping.
Cook Egg Yolks Properly: Whisk egg yolks and sugar over heat until thick and pale to pasteurize eggs and form a stable cream base.
Nutrition
- Serving Size: 1 slice
- Calories: 500 kcal
- Sugar: 25 g
- Sodium: 60 mg
- Fat: 40 g
- Saturated Fat: 22.5 g
- Unsaturated Fat: 17.5 g
- Trans Fat: 0 g
- Carbohydrates: 30 g
- Fiber: 1.5 g
- Protein: 6.5 g
- Cholesterol: 225 mg