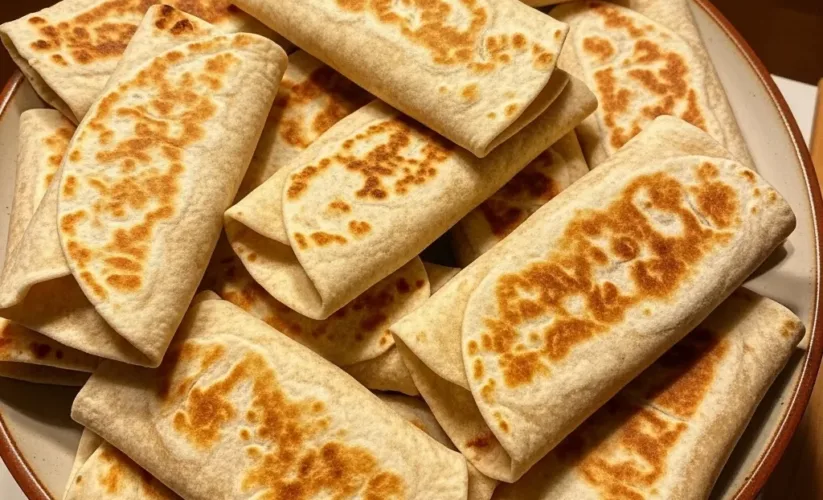
Gluten Free Wraps
Meal times in our house, with three hungry kids, often feel like a joyful whirlwind. But I remember a time when finding something everyone loved, especially my son with his gluten sensitivity, felt like an impossible puzzle. Store-bought options often disappointed us – they were either crumbly, stiff, or just lacked that homemade warmth.
I craved a versatile base for everything from quick lunch roll-ups to savory dinner wraps. So, I experimented. Flour after flour, mixture after mixture.
Finally, after many attempts, I cracked the code to making truly pliable, delicious gluten free wraps. These aren’t just for those avoiding gluten; they’re for everyone who loves a soft, chewy wrap that holds up to any filling. My kids now rave about “Mom’s special wraps,” and honestly, that’s the highest compliment a mom can get. These incredible gluten free wraps changed our mealtime game, bringing simplicity and deliciousness back to our table.
Why You’ll Love These Gluten Free Wraps
You are about to discover your new favorite kitchen staple. These gluten free wraps are incredibly easy to make, transforming your gluten-free cooking experience. First and foremost, they taste amazing.
Forget the dry, brittle wraps you might be used to; these are soft, flexible, and perfectly chewy. They possess a neutral flavor profile, making them suitable for both sweet and savory applications. Moreover, they use simple, readily available ingredients, meaning no special trips to obscure health food stores.
You likely already have most items in your pantry. Preparing these gluten free wraps also gives you complete control over the ingredients, allowing you to avoid unwanted additives and preservatives found in many store-bought varieties. You save money by making them at home too!
Think about all the meal possibilities: quick breakfast burritos, fresh lunch wraps, or a delightful base for dinner. Finally, the process itself is surprisingly therapeutic. Rolling out the dough, watching them bubble on the griddle – it’s a small culinary joy. You will absolutely love the versatility and deliciousness these homemade gluten free wraps bring to your family’s table, making healthy eating both simple and delightful.
Ingredients You’ll Need
Gathering your ingredients is the first step towards these incredible gluten free wraps. You will find most of these items are pantry staples, simplifying your preparation process. Always use fresh ingredients for the best results.
Measuring precisely ensures the perfect consistency for your dough. Here’s what you need:

| Ingredient | Quantity |
|---|---|
| Gluten-Free All-Purpose Flour Blend | 2 cups (240g) |
| Xanthan Gum | 1 teaspoon (omit if your blend already contains it) |
| Baking Powder | 1 teaspoon |
| Salt | ½ teaspoon |
| Warm Water | 1 cup (240ml) |
| Olive Oil (or other neutral oil) | 2 tablespoons + more for cooking |
A good quality gluten-free all-purpose flour blend makes a huge difference. Look for one that explicitly states it’s for baking and contains a mix of rice flour, tapioca starch, and potato starch. Xantham gum is crucial for elasticity in gluten free wraps, mimicking gluten.
If your flour blend already includes it, skip adding extra. Warm water helps activate the flours and creates a pliable dough. Finally, olive oil adds richness and flexibility to your homemade gluten free wraps, ensuring they don’t stick.
Substitutions & Variations
One of the beautiful aspects of making your own gluten free wraps is the flexibility to customize them. You can easily adapt this recipe to suit dietary needs or simply to experiment with different flavors. For instance, if you prefer a different fat, coconut oil or avocado oil make excellent alternatives to olive oil, lending a slightly different flavor profile while maintaining moisture.
Furthermore, if you require a grain-free option, you can experiment with alternative flours. A blend of cassava flour and almond flour can work, although you might need to adjust the water content slightly as these flours absorb liquid differently. Always start with less water and add incrementally until you reach a pliable dough consistency for your gluten free wraps.
To add an extra nutritional boost or a vibrant color, consider incorporating finely ground vegetables into your dough. Spinach powder, beetroot powder, or even a small amount of pureed cooked sweet potato can impart unique colors and subtle flavors. For example, a tablespoon of spinach powder gives your gluten free wraps a lovely green hue, perfect for a kids’ party or just a fun meal.
You can also infuse herbs and spices directly into the dough. Garlic powder, onion powder, or a pinch of dried oregano or basil elevate the savory profile of these gluten free wraps, making them ideal for Mediterranean or Italian-inspired fillings. Moreover, a touch of chili powder or smoked paprika adds a delicious warmth.
For a slightly sweeter wrap, suitable for fruit and yogurt fillings, you could add a teaspoon of maple syrup or a pinch of cinnamon to the dough. Remember, when experimenting with additions, start small and adjust to your taste. These homemade gluten free wraps are your canvas!
The beauty of customizing these wraps lies in their ability to complement a variety of flavors and meals. Just as you adapt your wraps for taste and dietary needs, you can also explore other satisfying gluten-free main dishes like Gluten Free Fried Chicken, providing a complete and delicious meal experience.
Step-by-Step Instructions
Making these gluten free wraps is a straightforward process, even for beginners. Follow these steps for perfect, pliable wraps every time.
Note: This video is for demonstration purposes and may use a slightly different method.
1. Mix Dry Ingredients:
In a large bowl, whisk together the gluten-free all-purpose flour blend, xanthan gum (if using), baking powder, and salt. Thoroughly combine these ingredients. This step ensures even distribution of leavening agents and seasoning, crucial for the texture of your gluten free wraps.
2. Add Wet Ingredients:
Pour in the warm water and olive oil. Mix with a spoon or your hands until a shaggy dough forms. Then, turn the dough out onto a lightly floured surface (using a little extra gluten-free flour).
Knead for about 5-7 minutes. The dough will become smooth and elastic, unlike traditional gluten dough, but still very manageable. It’s important not to over-knead. The goal is to create a cohesive ball for your gluten free wraps.
3. Rest the Dough:
Shape the dough into a ball. Place it back in the bowl, cover it with a clean kitchen towel or plastic wrap, and let it rest for at least 30 minutes at room temperature. This resting period is vital. It allows the flours to fully hydrate, resulting in more flexible and less crumbly gluten free wraps.
4. Divide and Roll:
After resting, divide the dough into 8-10 equal pieces. Shape each piece into a small ball. Lightly flour your work surface and rolling pin with gluten-free flour.
Take one dough ball and roll it out into a thin circle, about 6-8 inches in diameter. Aim for a thickness similar to a regular tortilla. Don’t worry if they aren’t perfectly round; rustic charm is part of the appeal. Continue this process for all the dough balls, stacking the rolled-out gluten free wraps with parchment paper in between to prevent sticking.
5. Cook the Wraps:
Heat a non-stick skillet or cast-iron griddle over medium-high heat. Lightly brush the pan with a tiny bit of olive oil, if needed (though a good non-stick pan may not require it). Place one rolled-out wrap onto the hot skillet.
Cook for 1-2 minutes per side, or until golden-brown spots appear and the wrap begins to puff up. Flip and cook the other side. You want them cooked through but still soft and pliable.
Repeat with the remaining dough. As you cook the gluten free wraps, stack them on a plate and cover with a clean kitchen towel to keep them warm and soft.
6. Serve Immediately:
Serve your warm, fresh gluten free wraps with your favorite fillings. Enjoy the satisfaction of making your own delicious, versatile wraps!
Pro Tips for Success
Achieving perfect gluten free wraps consistently involves a few key techniques. First, do not skip the resting time for the dough. This step is non-negotiable for hydrated, pliable wraps.
The gluten-free flours need time to absorb the liquid fully, preventing crumbly textures. Second, use a light hand when rolling. Over-flouring your surface or using too much pressure can make the wraps stiff.
Instead, use just enough flour to prevent sticking and roll gently and evenly. Third, heat your skillet properly. A hot skillet ensures quick cooking and those characteristic delightful bubbles. If the pan is not hot enough, the wraps will dry out before they cook through.

Moreover, consider the thickness of your wraps. Aim for a relatively thin circle, but not so thin that it tears easily. A thickness similar to a thin pancake works well.
Furthermore, when cooking, watch for those small bubbles on the surface; they indicate the perfect moment to flip. Once flipped, a few more golden spots should appear. Do not overcook them; overcooked gluten free wraps become brittle.
Immediately after cooking each wrap, stack them and cover them with a clean kitchen towel. This traps steam and keeps them soft and flexible, ready for filling. Finally, practice makes perfect.
Your first few wraps might not be perfectly round, but they will still taste delicious. You will quickly get a feel for the dough and the ideal cooking time. Mastering these tips will elevate your homemade gluten free wraps from good to absolutely amazing every time.
Mastering these techniques ensures your wraps are perfectly pliable every time, a dedication to detail that extends to all great gluten-free cooking. For another comforting dish where careful preparation makes all the difference, consider trying our Gluten Free Lasagna, a truly heartwarming meal.
Storage & Reheating Tips
These homemade gluten free wraps store beautifully, making them excellent for meal prep. After they cool completely, stack them with small pieces of parchment paper in between to prevent sticking. Place them in an airtight container or a resealable freezer bag.
Store them in the refrigerator for up to 3-4 days. For longer storage, you can freeze them for up to 2-3 months. Again, use parchment paper between each wrap before freezing them flat in a freezer bag. This prevents them from sticking together and allows you to grab just one or two as needed.
When you’re ready to enjoy them, reheating is simple. From the refrigerator, you can warm them briefly in a dry skillet over medium heat for about 30 seconds per side, until soft and warm. Alternatively, a quick zap in the microwave for 10-15 seconds works wonders, but be careful not to overdo it, as they can become tough.
From frozen, thaw the gluten free wraps in the refrigerator overnight or on the counter for an hour. Then, reheat as you would refrigerated wraps. These gluten free wraps maintain their delicious texture remarkably well, ensuring you always have a wholesome option on hand for quick meals.
What to Serve With This Recipe
The versatility of these gluten free wraps truly shines when you consider the endless serving possibilities. For a quick and nourishing lunch, fill them with hummus, fresh spinach, shredded carrots, cucumber, and a slice of grilled chicken or turkey. This creates a balanced and satisfying meal.
You could also make a vibrant veggie wrap with a creamy avocado spread and a medley of seasonal vegetables like bell peppers, red onion, and cherry tomatoes. These gluten free wraps are also perfect for breakfast. Imagine soft scrambled eggs, a sprinkle of cheese, and some salsa for a delicious breakfast burrito. Add black beans and corn for extra protein and fiber.

For dinner, these gluten free wraps make an excellent base for tacos or fajitas. Fill them with seasoned ground beef, chicken, or lentils, topped with shredded lettuce, cheese, and a dollop of sour cream or Greek yogurt. They also work wonderfully as a side to a hearty chili or soup, perfect for dipping.
Consider using them for mini pizzas: spread with tomato sauce, sprinkle with cheese and your favorite toppings, then bake until bubbly. For a sweet treat, spread a wrap with nut butter, sliced bananas, and a drizzle of honey or a sprinkle of cinnamon for a dessert wrap.
You can even create delightful pinwheels for parties by spreading cream cheese, herbs, and deli meat, then rolling tightly and slicing. These gluten free wraps effortlessly adapt to any meal, truly making them a family favorite.
The endless serving possibilities for these gluten free wraps make them a kitchen MVP, adapting to any meal from a light lunch to a hearty dinner. Imagine them filled with savory ingredients, much like how our flavorful Gluten Free Meatballs can elevate any pasta or sub sandwich.
FAQs
Can I make the dough for these gluten free wraps ahead of time?
Absolutely! You can prepare the dough for these gluten free wraps up to 24 hours in advance. After kneading, wrap the dough tightly in plastic wrap and store it in the refrigerator.
Before rolling, let it come to room temperature for about 30-60 minutes. This makes the dough easier to work with and ensures your gluten free wraps remain pliable.
Why are my gluten free wraps falling apart or too dry?
Several factors can cause your gluten free wraps to be crumbly or dry. First, ensure you used enough liquid. Gluten-free flours absorb moisture differently, so minor adjustments to water might be necessary.
Also, insufficient xanthan gum (if your blend doesn’t contain it) can lead to a lack of elasticity. Overcooking is another common culprit; cook them only until golden spots appear and they puff slightly. Not allowing the dough to rest sufficiently also contributes to dryness, as the flours need time to hydrate. Pay close attention to these steps for perfect gluten free wraps.
Can I use a different type of gluten-free flour?
Yes, you can experiment, but results may vary. This recipe specifically calls for a gluten-free all-purpose flour blend, which typically combines various flours (like rice, tapioca, and potato) for optimal texture.
Using a single-grain flour like almond flour or coconut flour will require significant adjustments to the liquid content and possibly the addition of more binding agents. Stick to an all-purpose blend for the best results and easiest experience with these gluten free wraps, especially if you are new to gluten-free baking.
How do I make my gluten free wraps puff up more?
To encourage more puffing in your gluten free wraps, ensure your skillet is hot enough, but not smoking. Medium-high heat is ideal. Also, roll the wraps to an even, relatively thin thickness.
When the wrap hits the hot pan, the moisture inside rapidly turns to steam, causing it to puff. Flipping the wrap just once after the first side has developed a few bubbles and lightly browned can also help trap steam and promote a fuller puff for your gluten free wraps.
Gluten-free wraps offer a versatile alternative to traditional tortillas, accommodating individuals with gluten sensitivities or celiac disease. These pliable flatbreads are typically made from a blend of gluten-free flours like rice, almond, or tapioca, providing a flexible base for countless fillings. Their development has significantly expanded meal options for those seeking a gluten-free diet, from breakfast burritos to savory dinner roll-ups.
Nutrition Information (per serving)
Understanding the nutritional value of your homemade gluten free wraps helps you integrate them into a healthy diet. This information is an estimate and can vary based on specific brands of ingredients used. These values are based on dividing the recipe into 10 servings.
| Nutrient | Amount |
|---|---|
| Calories | 140 kcal |
| Total Fat | 4g |
| Saturated Fat | 0.5g |
| Cholesterol | 0mg |
| Sodium | 120mg |
| Total Carbohydrates | 24g |
| Dietary Fiber | 1g |
| Total Sugars | 0g |
| Protein | 2g |

gluten free wraps
Meal times in our house, with three hungry kids, often feel like a joyful whirlwind. But I remember a time when finding something everyone loved, especially my son with his gluten sensitivity, felt like an impossible puzzle. Store-bought options often disappointed us – they were either crumbly, stiff, or just lacked that homemade warmth. I craved a versatile base for everything from quick lunch roll-ups to savory dinner wraps. So, I experimented. Flour after flour, mixture after mixture. Finally, after many attempts, I cracked the code to making truly pliable, delicious gluten free wraps. These aren't just for those avoiding gluten; they're for everyone who loves a soft, chewy wrap that holds up to any filling. My kids now rave about "Mom's special wraps," and honestly, that's the highest compliment a mom can get. These incredible gluten free wraps changed our mealtime game, bringing simplicity and deliciousness back to our table. You are about to discover your new favorite kitchen staple. These gluten free wraps are incredibly easy to make, transforming your gluten-free cooking experience. First and foremost, they taste amazing. Forget the dry, brittle wraps you might be used to; these are soft, flexible, and perfectly chewy. They possess a neutral flavor profile, making them suitable for both sweet and savory applications. Moreover, they use simple, readily available ingredients, meaning no special trips to obscure health food stores. You likely already have most items in your pantry. Preparing these gluten free wraps also gives you complete control over the ingredients, allowing you to avoid unwanted additives and preservatives found in many store-bought varieties. You save money by making them at home too! Think about all the meal possibilities: quick breakfast burritos, fresh lunch wraps, or a delightful base for dinner. Finally, the process itself is surprisingly therapeutic. Rolling out the dough, watching them bubble on the griddle – it's a small culinary joy. You will absolutely love the versatility and deliciousness these homemade gluten free wraps bring to your family's table, making healthy eating both simple and delightful.
- Total Time: 75 mins
- Yield: 10 wraps 1x
Ingredients
2 cups Gluten-Free All-Purpose Flour Blend
1 teaspoon Xanthan Gum
1 teaspoon Baking Powder
½ teaspoon Salt
1 cup Warm Water
2 tablespoons Olive Oil
Instructions
- In a large bowl, whisk together the gluten-free all-purpose flour blend, xanthan gum (if using), baking powder, and salt. Thoroughly combine these ingredients
- Pour in the warm water and olive oil. Mix with a spoon or your hands until a shaggy dough forms. Then, turn the dough out onto a lightly floured surface (using a little extra gluten-free flour). Knead for about 5-7 minutes. The dough will become smooth and elastic, unlike traditional gluten dough, but still very manageable. It’s important not to over-knead. The goal is to create a cohesive ball for your gluten free wraps
- Shape the dough into a ball. Place it back in the bowl, cover it with a clean kitchen towel or plastic wrap, and let it rest for at least 30 minutes at room temperature
- After resting, divide the dough into 8-10 equal pieces. Shape each piece into a small ball. Lightly flour your work surface and rolling pin with gluten-free flour. Take one dough ball and roll it out into a thin circle, about 6-8 inches in diameter. Aim for a thickness similar to a regular tortilla. Don't worry if they aren't perfectly round; rustic charm is part of the appeal. Continue this process for all the dough balls, stacking the rolled-out gluten free wraps with parchment paper in between to prevent sticking
- Heat a non-stick skillet or cast-iron griddle over medium-high heat. Lightly brush the pan with a tiny bit of olive oil, if needed (though a good non-stick pan may not require it). Place one rolled-out wrap onto the hot skillet. Cook for 1-2 minutes per side, or until golden-brown spots appear and the wrap begins to puff up. Flip and cook the other side. You want them cooked through but still soft and pliable. Repeat with the remaining dough. As you cook the gluten free wraps, stack them on a plate and cover with a clean kitchen towel to keep them warm and soft
- Serve your warm, fresh gluten free wraps with your favorite fillings. Enjoy the satisfaction of making your own delicious, versatile wraps!
Notes
Do not skip the 30-minute resting time for the dough; it's crucial for hydrated and pliable wraps.
Use a light hand when rolling the dough, using just enough gluten-free flour to prevent sticking, and aim for an even, relatively thin circle (similar to a thin pancake).
Ensure your skillet is properly heated to medium-high for quick cooking and to encourage bubbles. Watch for small bubbles on the surface as an indicator to flip; do not overcook as they can become brittle.
Immediately after cooking each wrap, stack and cover them with a clean kitchen towel to trap steam and keep them soft and flexible.
Store cooled wraps with parchment paper in between in an airtight container in the refrigerator for 3-4 days, or freeze for 2-3 months.
Reheat refrigerated wraps in a dry skillet for 30 seconds per side or microwave for 10-15 seconds. Thaw frozen wraps overnight in the refrigerator before reheating.
- Prep Time: 25 mins
- Cook Time: 20 mins
- Category: Bread
- Method: Stovetop
- Cuisine: American
- Diet: Gluten Free
Nutrition
- Serving Size: 1 wrap
- Calories: 140 kcal
- Sugar: 0g
- Sodium: 120mg
- Fat: 4g
- Saturated Fat: 0.5g
- Unsaturated Fat: 3.5g
- Trans Fat: 0g
- Carbohydrates: 24g
- Fiber: 1g
- Protein: 2g
- Cholesterol: 0mg