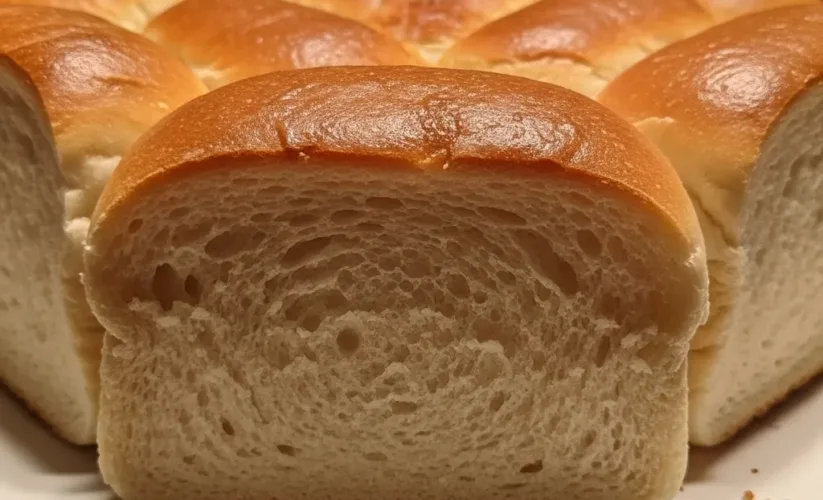
Gluten free sandwich bread
My kitchen often feels like the heart of our home, especially when the scent of fresh baking fills the air. With three energetic kids running around, I’ve learned that good food, made with love, truly fuels both body and soul. For years, finding a truly satisfying gluten free sandwich bread was a quest, a veritable holy grail.
So many store-bought options were dry, crumbly, or tasted like cardboard. My children, bless their hearts, would often pick at their lunches, leaving behind sad, broken sandwich halves. It broke my mama heart!
I longed for a soft, pliable, and delicious gluten free sandwich bread that would hold up to their favorite fillings, from turkey and cheese to peanut butter and jelly, without falling apart. After countless experiments, a few baking disasters (we won’t talk about the rock-hard loaf incident!), and a whole lot of flour on my counter, I finally cracked the code. This recipe for gluten free sandwich bread is not just “good for gluten-free” – it’s simply *good bread*.
It’s become a staple in our household, saving lunchtimes and bringing smiles to my kids’ faces. Knowing I can bake a wholesome, nourishing loaf of gluten free sandwich bread that everyone enjoys fills me with such joy. It’s simple, it’s delicious, and it proves that delicious gluten-free living is absolutely within reach for everyone.
Why You’ll Love This Homemade Gluten Free Sandwich Bread
You are going to absolutely adore this recipe, I promise! For starters, it eliminates the endless hunt for a decent gluten free sandwich bread at the grocery store. This loaf is incredibly soft, with a perfectly golden crust, and a tender crumb that makes slicing a dream.
It toasts beautifully, holds up perfectly in lunchboxes, and won’t crumble into a million pieces the moment you try to spread jam on it. This gluten free sandwich bread has a neutral flavor, making it versatile enough for savory sandwiches or sweet toasts. It’s truly a game-changer for anyone navigating a gluten-free lifestyle, whether for celiac disease, gluten sensitivity, or simply choosing a gluten-free diet.
Plus, the process of baking your own gluten free sandwich bread from scratch is so rewarding. You control every ingredient, ensuring it’s packed with simple, wholesome goodness. Say goodbye to dry, dense, and disappointing loaves; say hello to your new favorite gluten free sandwich bread!
Ingredients You’ll Need
Making delicious gluten free sandwich bread doesn’t require a specialty store trip! Most of these ingredients are likely already in your pantry or easily found at your local supermarket.

| Ingredient | Quantity | Notes |
|---|---|---|
| Warm Water | 1 ½ cups | Around 105-115°F (40-46°C) – crucial for activating yeast. |
| Granulated Sugar | 2 tablespoons | Feeds the yeast and adds a touch of sweetness. |
| Active Dry Yeast | 2 ¼ teaspoons (1 standard packet) | Ensure it’s fresh for optimal rise. |
| Gluten-Free All-Purpose Flour Blend | 3 cups | Look for a blend with xanthan gum included. My favorite is King Arthur Measure for Measure or Bob’s Red Mill 1:1. |
| Xanthan Gum | 1 teaspoon | If your GF flour blend does NOT contain xanthan gum, add this separately. It provides elasticity. |
| Salt | 1 teaspoon | Enhances flavor and controls yeast activity. |
| Large Eggs | 2 | Room temperature is best for texture. |
| Olive Oil (or other neutral oil) | ¼ cup | Adds moisture and tenderness to the gluten free sandwich bread. |
| Apple Cider Vinegar | 1 teaspoon | Helps with rise and tenderizes the crumb. |
Substitutions & Variations
One of the beautiful things about baking is adapting recipes to fit your needs and tastes! This gluten free sandwich bread recipe is quite forgiving.
* Flour Blends: While I recommend a high-quality gluten-free all-purpose blend with xanthan gum included for the best results, you can experiment. If your blend doesn’t have xanthan gum, remember to add 1 teaspoon as specified. Avoid single-flour substitutes like just rice flour, as they won’t give you the same texture for this gluten free sandwich bread.
* Dairy-Free: This recipe is naturally dairy-free if you use olive oil or another plant-based oil! Many gluten-free breads rely on milk powder, but not this one.
* Egg Substitutes: For an egg-free version, you can try using two “flax eggs” (2 tablespoons ground flaxseed mixed with 6 tablespoons water, let sit for 5 minutes until gelled).
The texture might be slightly different, a bit denser, but it will still yield a delicious gluten free sandwich bread.
* Sweetness Level: If you prefer a less sweet loaf, you can reduce the sugar to 1 tablespoon. The sugar primarily feeds the yeast, so a small amount is still beneficial for the rise of your gluten free sandwich bread.
* Add-Ins: Feel free to get creative! Stir in 1/4 cup of sunflower seeds, poppy seeds, or sesame seeds into the dough for added texture and nutrients. Dried herbs like a teaspoon of dried rosemary or thyme would also make a lovely savory gluten free sandwich bread.
* Sweet Bread Variation: For a slightly sweeter, almost challah-like gluten free sandwich bread, increase the sugar to 3 tablespoons and consider adding a teaspoon of vanilla extract. This makes a fantastic base for French toast!
Adapting recipes to fit your needs is a joy in the kitchen, and understanding gluten-free flours opens up many possibilities. Just as you master this bread, you can also explore how different flours perform in other delicious meals like Gluten Free Fried Chicken.
Step-by-Step Instructions
Making this wonderful gluten free sandwich bread is simpler than you might think. Follow these steps for a perfect loaf every time.
Note: This video is for demonstration purposes and may use a slightly different method.
1. Activate the Yeast: In a large mixing bowl (or the bowl of a stand mixer fitted with a paddle attachment), combine the warm water and granulated sugar. Sprinkle the active dry yeast over the top.
Let it sit for 5-10 minutes until it looks foamy and bubbly. This shows your yeast is alive and ready to work its magic for your gluten free sandwich bread!
2.
Combine Dry Ingredients: In a separate medium bowl, whisk together the gluten-free all-purpose flour blend, xanthan gum (if adding separately), and salt. Give it a good whisk to ensure everything is evenly distributed.
3.
Mix Wet Ingredients: To the foamy yeast mixture, add the room temperature eggs, olive oil, and apple cider vinegar. Whisk everything together until well combined.
4.
Combine Wet and Dry: Gradually add the dry ingredient mixture to the wet ingredients, mixing on low speed with a stand mixer, or by hand with a sturdy spatula. Once the flour is incorporated, increase the mixer speed to medium (or continue mixing vigorously by hand) for about 3-4 minutes. The dough for gluten free sandwich bread will be thick and sticky, more like a very thick cake batter than traditional bread dough.
Do not expect it to be kneadable.
5. Prepare Loaf Pan: Lightly grease a 9×5 inch loaf pan.
You can also line it with parchment paper for easy removal.
6. Transfer Dough: Scrape the sticky dough into the prepared loaf pan.
Use a wet spatula or your wet hands to gently smooth the top of the dough. This helps create an even rise and a beautiful top crust for your gluten free sandwich bread.
7.
Proof the Dough: Cover the loaf pan loosely with plastic wrap or a clean kitchen towel. Place it in a warm, draft-free spot. I often preheat my oven to its lowest setting for a few minutes, then turn it off and let the residual heat create a perfect proofing environment.
Let the dough rise for 45-60 minutes, or until it has nearly doubled in size and crowned beautifully above the rim of the pan. This rise is crucial for light and airy gluten free sandwich bread.
8.
Preheat Oven: While the dough is proofing, preheat your oven to 375°F (190°C).
9. Bake: Once the dough has risen sufficiently, carefully transfer the loaf pan to the preheated oven.
Bake for 40-50 minutes, or until the crust is golden brown and the internal temperature reaches 200-210°F (93-99°C) when checked with an instant-read thermometer. If the top browns too quickly, you can loosely tent it with aluminum foil for the last 10-15 minutes of baking.
10.
Cool: Remove the gluten free sandwich bread from the oven and immediately invert it onto a wire rack to cool completely. Allowing it to cool fully is incredibly important for the texture and to prevent a gummy interior. This could take 1-2 hours.
Resist the urge to slice into it too soon! Enjoying warm gluten free sandwich bread is tempting, but patience pays off.
Pro Tips for Success
Baking gluten free sandwich bread can feel a bit different from traditional bread, but with these tips, you’ll achieve perfect results every time.

* Accurate Measuring: Gluten-free baking is precise. Always scoop your gluten-free flour blend into the measuring cup and level it off with a straight edge. Don’t pack it down.
Too much flour will result in a dry, dense gluten free sandwich bread.
* Room Temperature Ingredients: Ensure your eggs are at room temperature. This helps them incorporate better into the batter, leading to a smoother dough and a more even texture in your finished gluten free sandwich bread.
* The Right Warmth for Proofing: Yeast loves warmth, but not too hot! Your water should feel like a warm bath – around 105-115°F (40-46°C). For proofing, a warm, draft-free spot is key.
My favorite trick is to heat the oven for a few minutes and then turn it off, creating a perfect environment for the gluten free sandwich bread to rise.
* Don’t Overmix, but Mix Well: While you won’t “knead” this gluten free sandwich bread dough like traditional bread, mixing it for the recommended 3-4 minutes with a stand mixer is crucial. This helps activate the starches and gums, developing the structure that gives gluten-free bread its elasticity.
* The Power of Xanthan Gum: If your flour blend doesn’t include it, do NOT skip the xanthan gum. It acts as the “gluten” in gluten-free baking, providing elasticity and preventing your gluten free sandwich bread from being crumbly.
* Cool Completely: This is arguably the most important tip!
Gluten-free bread continues to set and firm up as it cools. Slicing into a warm loaf of gluten free sandwich bread can result in a gummy texture. Patience is a virtue here; let it cool for at least 1-2 hours, or even longer.
* Use an Oven Thermometer: Oven temperatures can vary widely. An inexpensive oven thermometer ensures your oven is actually at 375°F (190°C), preventing under-baking or over-baking your beautiful gluten free sandwich bread.
Achieving perfect gluten-free results often hinges on precision and attention to detail in baking. These careful steps not only ensure a delicious loaf but also translate to other intricate dishes, such as a comforting Gluten Free Lasagna.
Storage & Reheating Tips
Once you’ve baked your perfect loaf of gluten free sandwich bread, you’ll want to keep it fresh and delicious!
* Countertop Storage: Once completely cooled, slice the gluten free sandwich bread and store it in an airtight container or a large zip-top bag at room temperature for up to 3-4 days. For optimal freshness, I recommend storing it sliced.
* Freezing for Longer Term: This gluten free sandwich bread freezes beautifully!
Once completely cooled, slice the entire loaf. Place parchment paper between slices to prevent sticking, then wrap the entire loaf tightly in plastic wrap, followed by aluminum foil, or store in a freezer-safe bag. It will keep well in the freezer for up to 3 months.
Freezing a loaf of this amazing gluten free sandwich bread is such a time-saver!
* Thawing & Reheating: To thaw, simply take out the desired number of slices and let them come to room temperature on the counter for about 15-20 minutes. You can also toast them directly from frozen.
For a whole loaf, let it thaw overnight in the refrigerator or at room temperature. Reheat individual slices in a toaster or toaster oven for a few minutes until warmed through and slightly crisp. You can also warm a whole loaf, wrapped in foil, in a 300°F (150°C) oven for about 10-15 minutes.
What to Serve With This Recipe
The possibilities with this versatile gluten free sandwich bread are truly endless! Its soft texture and neutral flavor make it perfect for just about anything.

* Classic Sandwiches: Of course, the primary purpose of this gluten free sandwich bread is for amazing sandwiches! Think turkey and Swiss, ham and cheddar, or a classic BLT. For the kids, peanut butter and jelly or cream cheese and cucumber are always winners.
* Hearty Toasts: This bread makes incredible toast. Top it with smashed avocado and everything bagel seasoning for a delicious breakfast, or a fried egg and a sprinkle of hot sauce. It’s also perfect for cinnamon sugar toast or a smear of your favorite fruit jam.
* Grilled Cheese: Oh, the grilled cheese! This gluten free sandwich bread gets wonderfully golden and crispy on the outside, with gooey melted cheese inside. It’s pure comfort food perfection.
* Breakfast Sandwiches: Use this bread as the base for a fantastic breakfast sandwich with scrambled eggs, bacon, and cheese. It holds up beautifully.
* Soup Dippers: A slice of this gluten free sandwich bread is excellent for soaking up hearty soups and stews.
It’s sturdy yet soft enough to scoop up every last drop.
* Croutons: If you have any older slices, cut them into cubes, toss with olive oil and seasonings, and bake until crispy for homemade gluten-free croutons.
* French Toast: Slices of this bread, dipped in an egg and milk batter and griddled, make an absolutely delicious gluten-free French toast.
Top with berries and maple syrup!
* Garlic Bread: Brush slices with melted butter, garlic powder, and a sprinkle of parsley, then toast for a quick and easy side dish.
The versatility of this gluten-free bread makes it ideal for a wide array of meals, from simple sandwiches to creative culinary uses. Similarly, many beloved comfort foods can be adapted to be gluten-free, including delicious Gluten Free Meatballs.
FAQs
Can I make this recipe completely vegan?
Yes, you can! Substitute the two large eggs with flax eggs (2 tablespoons ground flaxseed mixed with 6 tablespoons water, let sit for 5 minutes until gelled). The texture of your gluten free sandwich bread might be slightly denser, but it will still be delicious.
Why is my gluten free sandwich bread crumbly?
Crumbly gluten-free bread often means too much flour, not enough xanthan gum, or insufficient mixing. Ensure you are accurately measuring your flour, adding the xanthan gum if your blend doesn’t include it, and mixing the dough for the full 3-4 minutes to develop its structure. Also, always allow your gluten free sandwich bread to cool completely before slicing.
What if my yeast doesn’t foam?
If your yeast doesn’t foam after 5-10 minutes, it’s likely inactive or “dead.” This can happen if the water was too hot, too cold, or if the yeast is old. Discard the mixture and start again with new yeast and correctly tempered water. An active yeast is crucial for a good rise in your gluten free sandwich bread.
Can I use a bread machine for this gluten free sandwich bread recipe?
Yes, you can adapt this recipe for a bread machine! Add the wet ingredients first, then the dry ingredients, with the yeast on top. Select the “gluten-free” or “basic” cycle, usually for a 1.5-2 lb loaf.
Keep an eye on the dough during mixing; it should be thick but pourable. You might need to adjust the liquid slightly.
How do I know when my gluten free sandwich bread is fully baked?
The best way to tell is by checking the internal temperature with an instant-read thermometer. It should register between 200-210°F (93-99°C). Visually, the crust will be golden brown, and the loaf will sound hollow when tapped on the bottom.
Can I add seeds or nuts to this gluten free sandwich bread?
Absolutely! Stir in about 1/4 to 1/2 cup of your favorite seeds (like sunflower, pumpkin, or flax) or finely chopped nuts into the dough during the last minute of mixing. This adds wonderful flavor and texture to your gluten free sandwich bread.
Gluten-free sandwich bread presents unique challenges in baking, primarily due to the absence of gluten, which provides elasticity and structure. However, advancements in ingredients and techniques have made it possible to create soft, pliable loaves for those following a gluten-free diet.
Nutrition Information (per serving)
*(Approximate values for one slice of gluten free sandwich bread, based on 16 slices per loaf)*
| Nutrient | Amount |
|---|---|
| Calories | 160 kcal |
| Total Fat | 4 g |
| Saturated Fat | 0.5 g |
| Cholesterol | 25 mg |
| Sodium | 150 mg |
| Total Carbohydrates | 28 g |
| Dietary Fiber | 2 g |
| Total Sugars | 3 g |
| Protein | 3 g |

gluten free sandwich bread
This gluten-free sandwich bread recipe is a staple in households for those navigating a gluten-free lifestyle. It offers a soft, pliable, and delicious loaf that holds up to various fillings without falling apart, and toasts beautifully. It has a neutral flavor, making it versatile for savory or sweet applications, and is naturally dairy-free with an option for an egg-free version.
- Total Time: 4 hours 5 minutes
- Yield: 1 loaf (16 slices) 1x
Ingredients
1 ½ cups Warm Water
2 tablespoons Granulated Sugar
2 ¼ teaspoons Active Dry Yeast
3 cups Gluten-Free All-Purpose Flour Blend
1 teaspoon Xanthan Gum
1 teaspoon Salt
2 Large Eggs
¼ cup Olive Oil
1 teaspoon Apple Cider Vinegar
Instructions
- In a large mixing bowl (or the bowl of a stand mixer fitted with a paddle attachment), combine the warm water and granulated sugar. Sprinkle the active dry yeast over the top. Let it sit for 5-10 minutes until it looks foamy and bubbly. This shows your yeast is alive and ready to work its magic for your gluten free sandwich bread!
- In a separate medium bowl, whisk together the gluten-free all-purpose flour blend, xanthan gum (if adding separately), and salt. Give it a good whisk to ensure everything is evenly distributed
- To the foamy yeast mixture, add the room temperature eggs, olive oil, and apple cider vinegar. Whisk everything together until well combined
- Gradually add the dry ingredient mixture to the wet ingredients, mixing on low speed with a stand mixer, or by hand with a sturdy spatula. Once the flour is incorporated, increase the mixer speed to medium (or continue mixing vigorously by hand) for about 3-4 minutes. The dough for gluten free sandwich bread will be thick and sticky, more like a very thick cake batter than traditional bread dough. Do not expect it to be kneadable
- Lightly grease a 9×5 inch loaf pan. You can also line it with parchment paper for easy removal
- Scrape the sticky dough into the prepared loaf pan. Use a wet spatula or your wet hands to gently smooth the top of the dough. This helps create an even rise and a beautiful top crust for your gluten free sandwich bread
- Cover the loaf pan loosely with plastic wrap or a clean kitchen towel. Place it in a warm, draft-free spot. I often preheat my oven to its lowest setting for a few minutes, then turn it off and let the residual heat create a perfect proofing environment. Let the dough rise for 45-60 minutes, or until it has nearly doubled in size and crowned beautifully above the rim of the pan. This rise is crucial for light and airy gluten free sandwich bread
- While the dough is proofing, preheat your oven to 375°F (190°C)
- Once the dough has risen sufficiently, carefully transfer the loaf pan to the preheated oven. Bake for 40-50 minutes, or until the crust is golden brown and the internal temperature reaches 200-210°F (93-99°C) when checked with an instant-read thermometer. If the top browns too quickly, you can loosely tent it with aluminum foil for the last 10-15 minutes of baking
- Remove the gluten free sandwich bread from the oven and immediately invert it onto a wire rack to cool completely. Allowing it to cool fully is incredibly important for the texture and to prevent a gummy interior. This could take 1-2 hours. Resist the urge to slice into it too soon! Enjoying warm gluten free sandwich bread is tempting, but patience pays off
Notes
Accurate Measuring: Always scoop gluten-free flour blend into the measuring cup and level it off. Too much flour will result in dry, dense bread.
Room Temperature Ingredients: Ensure eggs are at room temperature for better incorporation and a smoother dough.
The Right Warmth for Proofing: Water should be 105-115°F (40-46°C). For proofing, use a warm, draft-free spot, like an oven preheated briefly and then turned off.
Don't Overmix, but Mix Well: Mix for 3-4 minutes with a stand mixer to activate starches and gums for structure, as the dough is not kneadable.
The Power of Xanthan Gum: If your flour blend doesn't include it, do NOT skip the xanthan gum as it provides elasticity.
Cool Completely: This is crucial for texture. Slicing into warm gluten-free bread can result in a gummy texture. Cool for at least 1-2 hours.
Use an Oven Thermometer: Ensures accurate oven temperature to prevent under-baking or over-baking.
Countertop Storage: Store sliced, completely cooled bread in an airtight container or zip-top bag at room temperature for up to 3-4 days.
Freezing for Longer Term: Slice completely cooled bread, place parchment paper between slices, and wrap tightly in plastic wrap and foil or a freezer-safe bag. Freezes for up to 3 months.
Thawing & Reheating: Thaw slices at room temperature (15-20 mins) or toast from frozen. Reheat whole loaf wrapped in foil in a 300°F (150°C) oven for 10-15 minutes.
- Prep Time: 20 mins
- Cook Time: 45 mins
- Category: Bread
- Method: Baking
- Cuisine: American
- Diet: Gluten Free
Nutrition
- Serving Size: 1 slice
- Calories: 160 kcal
- Sugar: 3 g
- Sodium: 150 mg
- Fat: 4 g
- Saturated Fat: 0.5 g
- Unsaturated Fat: 3.5 g
- Trans Fat: 0 g
- Carbohydrates: 28 g
- Fiber: 2 g
- Protein: 3 g
- Cholesterol: 25 mg