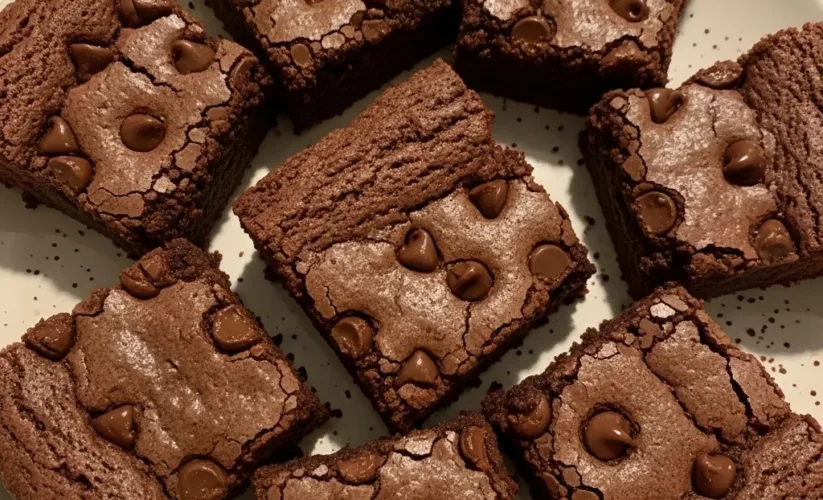
Gluten free brownies
Oh, the joy of a warm, fudgy brownie! I remember my middle daughter, Lily, used to get so sad at school potlucks. All her friends brought in their favorite cookies and cakes, but because of her friend Sarah’s gluten sensitivity, many treats were off-limits.
I knew then I had to perfect a recipe that everyone could enjoy, a recipe that screamed “love” in every bite, regardless of dietary needs. After countless batches (my kids certainly didn’t complain about being taste-testers!), I finally landed on these incredible gluten free brownies. They are rich, chewy, and so deeply chocolatey, you would never guess they are gluten-free.
Now, when I whip up a batch of these glorious gluten free brownies, the aroma fills our kitchen, bringing everyone running. They truly are a treat for all, proving that simple, nourishing food can be utterly delicious and inclusive.
Why You’ll Love These Gluten Free Brownies
You will adore these gluten free brownies for so many reasons. First, they deliver an intensely rich, chocolatey flavor that satisfies even the most serious cocoa cravings. We are talking deep, dark chocolate goodness here.
Then there is the texture. Oh, the texture! These brownies boast that perfect fudgy center with delightfully chewy edges, a hallmark of any truly great brownie.
You won’t find any dry, crumbly textures here; these are moist, dense, and utterly irresistible. Making these gluten free brownies is also surprisingly simple, using common pantry ingredients and straightforward steps. They come together quickly, making them ideal for a spontaneous dessert or a planned gathering.
Furthermore, they are a fantastic option for anyone avoiding gluten, but they taste so amazing that everyone will happily reach for seconds. You don’t sacrifice flavor or texture when you make these delicious gluten free brownies; you gain a universally loved treat. These are the gluten free brownies you’ll keep coming back to.
Ingredients You’ll Need

Gathering your ingredients for these amazing gluten free brownies is easy. You likely have many of these staples in your pantry right now. I always prioritize quality, especially with chocolate, as it makes a huge difference in the final flavor of these gluten free brownies.
| Ingredient | Quantity | Notes |
|---|---|---|
| Unsalted Butter | 1 cup (2 sticks) | Melted. Adds richness and moisture. |
| Granulated Sugar | 1 ½ cups | Sweetens and contributes to the chewy texture. |
| Light Brown Sugar | ½ cup, packed | Adds moisture and a subtle caramel note. |
| Large Eggs | 4 | At room temperature, essential for binding and structure. |
| Vanilla Extract | 2 teaspoons | Enhances the chocolate flavor beautifully. |
| Gluten-Free All-Purpose Flour Blend | ¾ cup | Look for a blend with xanthan gum for best results. |
| Unsweetened Cocoa Powder | ¾ cup | High-quality cocoa powder makes for rich gluten free brownies. |
| Salt | ½ teaspoon | Balances sweetness and deepens chocolate flavor. |
| Chocolate Chips or Chunks | 1 cup | Semi-sweet or dark chocolate, for extra pockets of melty goodness. |
This specific blend of ingredients creates the perfect balance for our chewy, fudgy gluten free brownies. Make sure your eggs are at room temperature; this helps them emulsify better with the melted butter and sugar, leading to a smoother batter and a better final texture for your gluten free brownies.
Substitutions & Variations
You can easily adapt these gluten free brownies to fit your preferences or what you have on hand. Flexibility in the kitchen makes cooking more enjoyable!
For the Flour: While a good quality gluten-free all-purpose flour blend (especially one containing xanthan gum) works best, you can experiment. Some people have success with a 1:1 gluten-free baking flour. Just ensure it’s specifically for baking and includes a binder. Avoid single-ingredient flours like almond or coconut flour unless you are very familiar with gluten-free baking, as they require different liquid ratios.
For the Fat: If you need dairy-free gluten free brownies, simply swap the unsalted butter for a good quality dairy-free butter alternative. Coconut oil can also work, but it might impart a slight coconut flavor and alter the texture slightly, making them a little less fudgy.
For the Sugar: You can adjust the sugar slightly if you prefer less sweetness, but be aware that sugar also contributes to the brownies’ fudgy texture. For a more intense, less sweet chocolate experience, consider reducing the granulated sugar by about ¼ cup.
For the Chocolate: This is where you can truly customize your gluten free brownies!
* Chocolate Chips/Chunks: Use milk chocolate for sweeter brownies, dark chocolate for a more sophisticated, less sweet bite, or even white chocolate chips for a fun contrast.
* Cocoa Powder: For a deeper, darker color and richer flavor, try using Dutch-processed cocoa powder.
* Extra Chocolate: Melt an additional ½ cup of chocolate with the butter for an even more intense chocolate base.
Flavor Enhancements:
* Coffee: Add 1 teaspoon of instant espresso powder to the batter. It won’t make your brownies taste like coffee, but it will significantly enhance the chocolate flavor.
* Extracts: Beyond vanilla, consider ½ teaspoon of almond extract for a subtle nutty note, or a few drops of peppermint extract for festive gluten free brownies.
* Spices: A pinch of cayenne pepper or chili powder can add an exciting, warm kick to your chocolate gluten free brownies.
Add-Ins:
* Nuts: Fold in ½ cup of chopped walnuts, pecans, or almonds for crunch and nutty flavor.
* Caramel: Swirl in some dulce de leche or caramel sauce just before baking for gooey caramel gluten free brownies.
* Candy: Crushed candy canes, mini marshmallows, or chopped candy bars make fun additions, especially for holiday or party gluten free brownies.
* Zest: Grate in a tablespoon of orange or lemon zest for a bright, citrusy counterpoint to the rich chocolate.
These variations ensure your gluten free brownies always feel fresh and exciting, catering to any craving!
The versatility of gluten-free baking allows for wonderful experimentation, transforming classic recipes into inclusive delights. Just as you can customize your brownie flour, you might also enjoy making a beloved Italian dessert accessible to all with a recipe for gluten-free tiramisu.
Step-by-Step Instructions
Note: This video is for demonstration purposes and may use a slightly different method.
Creating these perfect gluten free brownies is a straightforward process. Follow these steps carefully for the best results, ensuring a truly fudgy and delicious outcome.
1. Prepare Your Pan: First, preheat your oven to 350°F (175°C). Next, line a 9×13-inch baking pan with parchment paper, leaving an overhang on the sides.
This creates “handles” for easy removal of your gluten free brownies later. Lightly grease the parchment paper with cooking spray or butter. This step prevents sticking.
2. Melt Butter and Chocolate (Optional): In a large, microwave-safe bowl or a saucepan over low heat, melt the unsalted butter. If you decided to add extra melted chocolate as a variation, combine it with the butter now.
Stir until completely smooth. Remove from heat and let it cool slightly for a few minutes.
3. Combine Sugars and Butter: Pour the melted butter into a large mixing bowl. Add the granulated sugar and light brown sugar.
Whisk vigorously for about 1 minute until the mixture looks glossy and smooth. This vigorous whisking helps dissolve the sugars, contributing to the fudgy texture of your gluten free brownies.
4. Add Eggs and Vanilla: Crack the four large eggs into the sugar-butter mixture, one at a time, whisking well after each addition. The mixture should become light in color and slightly thickened.
Then, stir in the vanilla extract. Continue whisking for another minute until the mixture is truly light and airy. This aeration is crucial for a tender crumb in your gluten free brownies.
5. Whisk Dry Ingredients: In a separate medium bowl, combine the gluten-free all-purpose flour blend, unsweetened cocoa powder, and salt. Whisk these dry ingredients together thoroughly. This ensures even distribution and prevents lumps in your gluten free brownies.
6. Combine Wet and Dry: Gradually add the dry ingredient mixture to the wet mixture. Use a rubber spatula or a wooden spoon to gently fold the ingredients together.
Mix just until no dry streaks of flour remain. Do not overmix! Overmixing develops gluten (even in gluten-free flour, the starches can get tough) and can lead to dense, cakey gluten free brownies instead of fudgy ones.
7. Fold in Chocolate Chips: Gently fold in the chocolate chips or chunks. Make sure they are evenly distributed throughout the batter. These extra chocolate bits create delightful melty pockets within your gluten free brownies.
8. Pour and Bake: Pour the brownie batter into your prepared 9×13-inch baking pan. Spread it evenly using your spatula.
Place the pan in the preheated oven. Bake for 25-30 minutes.
9. Check for Doneness: Start checking at 25 minutes. Insert a toothpick into the center of the brownies.
It should come out with moist crumbs attached, but not wet batter. If the toothpick comes out completely clean, you have overbaked your gluten free brownies, and they might be dry. A few moist crumbs signal fudginess.
10. Cool Completely: Remove the pan from the oven. Let the gluten free brownies cool completely in the pan on a wire rack.
This step is critical! Warm brownies are delicate and will fall apart. Allowing them to cool solidifies their structure and enhances their fudgy texture. For truly clean cuts, you can even chill them in the refrigerator for an hour after they cool to room temperature.
Once cool, lift the gluten free brownies out of the pan using the parchment paper handles. Cut them into squares and enjoy!
Pro Tips for Success

Achieving perfect gluten free brownies every time requires a few key insights. These pro tips will elevate your baking and ensure you get that ultimate fudgy, chewy result.
* Do Not Overmix: This is perhaps the most crucial tip for any brownie, especially gluten free brownies. Once you add the dry ingredients, mix only until just combined. Overmixing develops the starches in gluten-free flour, leading to tough, cakey brownies rather than the desired fudgy texture.
Stop mixing as soon as you see no dry streaks of flour.
* Quality Ingredients Matter: Since these gluten free brownies rely heavily on chocolate flavor, use the best quality cocoa powder and chocolate chips you can afford. A good quality unsweetened cocoa powder makes a noticeable difference in the depth of flavor.
Similarly, premium chocolate chips melt beautifully and provide excellent texture.
* Room Temperature Eggs: Ensure your eggs are at room temperature. Room temperature eggs emulsify better with the melted butter and sugar mixture.
This creates a smoother, more uniform batter, which in turn leads to a more consistent and fudgy texture in your gluten free brownies. If you forget, place cold eggs in a bowl of warm water for 5-10 minutes.
* The Toothpick Test is Your Friend (with a Twist): When testing for doneness, insert a toothpick into the center.
For fudgy gluten free brownies, the toothpick should come out with *moist crumbs* attached, but not wet batter. If it comes out completely clean, you have likely overbaked them. If it comes out with wet batter, they need more time.
Trust those moist crumbs for perfection.
* Cool Completely (Seriously!): Resist the urge to cut into warm gluten free brownies. They are incredibly delicate and will fall apart.
Cooling them completely, preferably on a wire rack, allows them to set up properly, firming into that dense, fudgy consistency we all love. For the cleanest cuts, you can even chill them in the refrigerator for an hour or two after they’ve cooled to room temperature. This makes cutting sharp, clean squares much easier.
* Parchment Paper is a Must: Always line your pan with parchment paper, leaving an overhang. This simple step makes removing the entire slab of gluten free brownies from the pan incredibly easy, preventing sticking and allowing for perfect presentation.
* Know Your Oven: Oven temperatures can vary.
If your oven tends to run hot or cold, adjust the baking time accordingly. Getting to know your oven’s quirks helps ensure consistently perfect gluten free brownies.
Follow these tips, and you will consistently bake fantastic gluten free brownies that impress everyone.
Mastering the nuances of gluten-free baking, like avoiding overmixing, is essential for achieving the perfect texture in your brownies. These careful techniques are also crucial when crafting other delicate treats, such as light and airy gluten-free donuts.
Storage & Reheating Tips
Proper storage ensures your gluten free brownies stay fresh, fudgy, and delicious for days. You want to savor every single bite!
Once completely cooled, store your gluten free brownies in an airtight container at room temperature for up to 3-4 days. Placing a piece of parchment paper between layers of brownies can prevent them from sticking together if stacking. Keeping them sealed prevents them from drying out and losing their delightful fudgy texture.
For longer storage, you can freeze these gluten free brownies. Wrap individual brownies tightly in plastic wrap, then place them in an airtight freezer-safe bag or container. They will keep well in the freezer for up to 2-3 months. When you are ready to enjoy them, simply let them thaw at room temperature for a few hours.
Reheating these gluten free brownies is simple. If you prefer a warm brownie, place an individual square on a microwave-safe plate. Heat it for 10-15 seconds, or until just warmed through and gooey.
Be careful not to overheat, as this can dry them out. A gently warmed gluten free brownie is pure bliss!
What to Serve With This Recipe

These decadent gluten free brownies are fantastic on their own, but pairing them with a few simple additions can elevate the experience even further. Think about contrasting textures and flavors.
* A Scoop of Ice Cream: This is a classic for a reason! A generous scoop of vanilla bean ice cream, chocolate ice cream, or even a swirl of salted caramel ice cream perfectly complements the warm, fudgy gluten free brownies. The cold, creamy ice cream against the warm brownie is pure magic.
* A Glass of Milk: A tall, cold glass of milk (dairy or non-dairy!) is the ultimate companion to any rich chocolate treat, and these gluten free brownies are no exception. It cuts through the sweetness beautifully.
* Hot Coffee or Espresso: For the adults, a hot cup of freshly brewed coffee or a shot of espresso provides a wonderful bitter contrast to the sweet, chocolatey gluten free brownies.
It makes for an elegant after-dinner dessert.
* Fresh Berries: A handful of fresh raspberries, strawberries, or blueberries offers a bright, tart counterpoint to the rich sweetness of the brownies. It adds a lovely touch of freshness and color.
* Whipped Cream or Cool Whip: A dollop of freshly whipped cream lightens the richness of the gluten free brownies, adding an airy, creamy texture.
* Powdered Sugar Dusting: For a simple yet elegant presentation, dust the cooled gluten free brownies with a light layer of powdered sugar just before serving.
* Chocolate Sauce Drizzle: If you truly want to lean into the chocolate, a drizzle of warm chocolate fudge sauce or a homemade ganache over a warm gluten free brownie makes for an extra indulgent dessert.
No matter how you serve them, these gluten free brownies are sure to be a hit!
Elevating a simple treat with the right toppings can transform an ordinary dessert into an extraordinary experience. This same principle of adding delightful layers of flavor and texture also applies to a comforting breakfast pastry like gluten-free cinnamon rolls.
FAQs
What is the best gluten-free flour blend for brownies?
For these gluten free brownies, I highly recommend using a high-quality gluten-free all-purpose flour blend that contains xanthan gum. Brands like Bob’s Red Mill 1-to-1 Baking Flour or King Arthur Gluten-Free Measure for Measure Flour work exceptionally well.
The xanthan gum acts as a binder, mimicking gluten’s elasticity and helping achieve that perfect fudgy texture in your gluten free brownies without them becoming crumbly. Avoid using single-ingredient gluten-free flours like almond or coconut flour unless you are very experienced with their unique properties, as they can drastically change the moisture and texture of these gluten free brownies.
Can I make these gluten free brownies dairy-free?
Absolutely! Making these gluten free brownies dairy-free is quite simple. Just substitute the unsalted butter with an equal amount of your favorite dairy-free butter alternative.
There are many excellent plant-based butter sticks available on the market that melt and behave very similarly to regular butter in baking. You can also use coconut oil, but be aware it might impart a subtle coconut flavor, which some people enjoy. Ensure any chocolate chips or chunks you use are also dairy-free to keep your gluten free brownies completely free of dairy.
How do I know when my gluten free brownies are done?
Knowing when your gluten free brownies are perfectly baked is key to achieving that ideal fudgy texture. Start checking around 25 minutes of baking time. Insert a toothpick into the center of the pan.
For fudgy gluten free brownies, the toothpick should come out with moist crumbs attached, but not wet batter. If the toothpick comes out completely clean, they are likely overbaked and will be drier. If it comes out with liquid batter, they need more time. Always err on the side of slightly underbaking for maximum fudginess in your gluten free brownies.
Can I freeze gluten free brownies?
Yes, these gluten free brownies freeze beautifully! Freezing is a fantastic way to extend their shelf life and have a delicious treat ready whenever a craving strikes. Once the brownies are completely cooled, cut them into individual squares.
Wrap each square tightly in plastic wrap, then place them in an airtight freezer-safe bag or container. They will maintain their quality in the freezer for up to 2-3 months. To enjoy, simply remove them from the freezer and let them thaw at room temperature for a few hours. A quick zap in the microwave for 10-15 seconds can also warm them up beautifully.
Why are my gluten free brownies crumbly?
Crumbly gluten free brownies often result from one of a few common issues. First, you might have overbaked them. Overbaking dries out the brownies, making them more cake-like and prone to crumbling.
Remember the toothpick test for moist crumbs! Second, the type of gluten-free flour blend you use makes a difference. Ensure your blend contains xanthan gum, which helps bind the ingredients and prevents crumbliness.
If your blend doesn’t have it, consider adding about ¼ teaspoon per cup of flour. Finally, insufficient moisture in the recipe or not allowing the brownies to cool completely before cutting can also contribute to a crumbly texture. These gluten free brownies should be wonderfully fudgy.
Gluten-free brownies offer a delicious alternative for individuals with celiac disease or gluten sensitivity, using alternative flours like rice, almond, or tapioca to achieve that desired fudgy texture. These adaptations ensure that everyone can enjoy a rich, chocolatey treat without compromising on taste or dietary needs, contributing to a broader understanding of gluten-free diets.
Nutrition Information (per serving)
*Please note: Nutritional information is an estimate based on ingredients and preparation, calculated for one of 18 servings.*
| Nutrient | Amount |
|---|---|
| Calories | 280 kcal |
| Total Fat | 16 g |
| Saturated Fat | 10 g |
| Cholesterol | 60 mg |
| Sodium | 100 mg |
| Total Carbohydrates | 32 g |
| Dietary Fiber | 2 g |
| Total Sugars | 25 g |
| Protein | 3 g |

gluten free brownies
These incredible gluten free brownies are rich, chewy, and deeply chocolatey, designed for everyone to enjoy regardless of dietary needs. They boast a perfect fudgy center with delightfully chewy edges and are surprisingly simple to make, using common pantry ingredients and straightforward steps.
- Total Time: 3 hours 30 mins
- Yield: 18 servings 1x
Ingredients
1 cup Unsalted Butter
1 ½ cups Granulated Sugar
½ cup Light Brown Sugar, packed
4 Large Eggs
2 teaspoons Vanilla Extract
¾ cup Gluten-Free All-Purpose Flour Blend
¾ cup Unsweetened Cocoa Powder
½ teaspoon Salt
1 cup Chocolate Chips or Chunks
Instructions
- Preheat your oven to 350°F (175°C). Line a 9×13-inch baking pan with parchment paper, leaving an overhang on the sides. Lightly grease the parchment paper with cooking spray or butter
- In a large, microwave-safe bowl or a saucepan over low heat, melt the unsalted butter (and optional extra melted chocolate if using variation). Stir until completely smooth. Remove from heat and let it cool slightly for a few minutes
- Pour the melted butter into a large mixing bowl. Add the granulated sugar and light brown sugar. Whisk vigorously for about 1 minute until the mixture looks glossy and smooth
- Crack the four large eggs into the sugar-butter mixture, one at a time, whisking well after each addition. Then, stir in the vanilla extract. Continue whisking for another minute until the mixture is truly light and airy
- In a separate medium bowl, combine the gluten-free all-purpose flour blend, unsweetened cocoa powder, and salt. Whisk these dry ingredients together thoroughly
- Gradually add the dry ingredient mixture to the wet mixture. Use a rubber spatula or a wooden spoon to gently fold the ingredients together. Mix just until no dry streaks of flour remain. Do not overmix!
- Gently fold in the chocolate chips or chunks. Make sure they are evenly distributed throughout the batter
- Pour the brownie batter into your prepared 9×13-inch baking pan. Spread it evenly using your spatula. Place the pan in the preheated ove
- Bake for 25-30 minutes. Insert a toothpick into the center of the brownies; it should come out with moist crumbs attached, but not wet batter. If it comes out completely clean, you have overbaked your gluten free brownies
- Remove the pan from the oven. Let the gluten free brownies cool completely in the pan on a wire rack. This step is critical! Once cool, lift the brownies out of the pan using the parchment paper handles. Cut them into squares and enjoy!
Notes
Do not overmix the batter once dry ingredients are added; mix only until no dry streaks remain to prevent tough, cakey brownies.
Use high-quality cocoa powder and chocolate chips for the best flavor, as chocolate is a key component.
Ensure eggs are at room temperature for better emulsification with melted butter and sugar, leading to a smoother batter and fudgier texture.
For fudgy gluten free brownies, the toothpick test should show moist crumbs attached, not wet batter or a completely clean toothpick.
Cool brownies completely in the pan on a wire rack before cutting; they are incredibly delicate when warm. Chilling for an hour or two after cooling helps achieve cleaner, sharper cuts.
Always line your pan with parchment paper, leaving an overhang, for incredibly easy removal of the entire slab of brownies.
Store cooled brownies in an airtight container at room temperature for up to 3-4 days. For longer storage, wrap individual brownies tightly in plastic wrap and freeze for up to 2-3 months. Thaw at room temperature or warm briefly in the microwave for 10-15 seconds.
- Prep Time: 20 mins
- Cook Time: 25-30 mins
- Category: Dessert
- Method: Baking
- Cuisine: American
- Diet: Gluten Free
Nutrition
- Serving Size: 1 serving (1 of 18 brownies)
- Calories: 280 kcal
- Sugar: 25 g
- Sodium: 100 mg
- Fat: 16 g
- Saturated Fat: 10 g
- Unsaturated Fat: 6 g
- Trans Fat: 0 g
- Carbohydrates: 32 g
- Fiber: 2 g
- Protein: 3 g
- Cholesterol: 60 mg