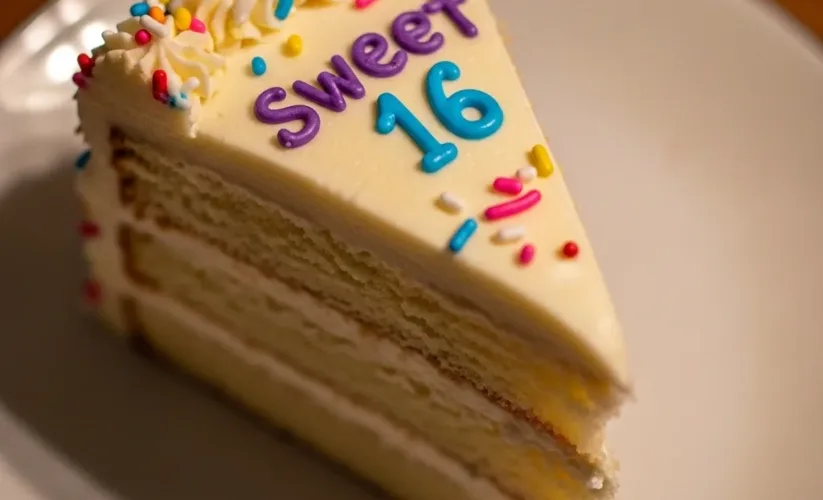
Sweet 16 Birthday Cake
Oh, the anticipation! I remember my own Sweet 16 like it was yesterday – a whirlwind of excitement, new dresses, and, of course, the grand reveal of *the* cake. It wasn’t just dessert; it was the centerpiece, a tangible symbol of crossing a threshold into a new chapter.
As a mom of three, I’ve had the joy of reliving that magic through my children’s friends and, someday soon, my own little ones. Creating a homemade Sweet 16 Birthday Cake isn’t just about mixing ingredients; it’s about pouring love into every step, knowing you’re crafting a memory that will last long after the last slice is gone. This isn’t about perfection; it’s about connection.
It’s about that delighted gasp when they see their very own special Sweet 16 Birthday Cake, made just for them. Forget the store-bought versions; we’re making something truly extraordinary, a delicious, tender, and absolutely stunning Sweet 16 Birthday Cake that will make any teen feel cherished and celebrated. Get ready to bake a memory!
Why You’ll Love This Sweet 16 Birthday Cake Recipe
You’ll truly adore this Sweet 16 Birthday Cake recipe for so many heartwarming reasons. First, it’s delightfully simple, even for those who might feel a little nervous about baking a showstopper. I believe food is love, and this recipe allows you to pour so much love into a creation without feeling overwhelmed.
The instructions are clear, straightforward, and designed for real home bakers, not professional patissiers. Furthermore, this Sweet 16 Birthday Cake boasts an incredible flavor profile. It’s tender, moist, and perfectly sweet, appealing to just about everyone.
It’s a classic vanilla cake, but with a richness that makes it feel incredibly special. It’s not too heavy, either, ensuring everyone enjoys their slice after a celebratory meal.
Beyond the taste, this particular Sweet 16 Birthday Cake recipe is wonderfully customizable. You can easily tailor it to match the birthday person’s unique personality and party theme. Do they love bright colors?
Add a few drops of food coloring to the frosting. Are they a fan of specific flavors? Infuse the cake with lemon zest or almond extract.
This flexibility means you can create a truly bespoke Sweet 16 Birthday Cake that feels personal and thoughtful. Imagine their face when they see a cake that perfectly reflects their style!
Finally, baking this Sweet 16 Birthday Cake creates an unforgettable experience. The aroma of vanilla filling your kitchen, the rhythmic stirring, the joy of decorating – it all adds to the celebratory atmosphere.
A homemade Sweet 16 Birthday Cake sends a powerful message: “You are important, and I care enough to make something beautiful for you.” It’s more than just a dessert; it’s a centerpiece for memories, a talking point, and a delicious way to celebrate such a significant milestone. Trust me, everyone will ask for the recipe for this fantastic Sweet 16 Birthday Cake!
Ingredients You’ll Need
Gathering your ingredients for this spectacular Sweet 16 Birthday Cake is the first exciting step. You’ll find most of these staples right in your pantry, making this a convenient and approachable project. Always aim for quality ingredients, as they truly elevate the final taste of your homemade Sweet 16 Birthday Cake. Fresh eggs, good quality butter, and pure vanilla extract make a noticeable difference in the richness and depth of flavor.

Here’s what you’ll need to create this amazing Sweet 16 Birthday Cake:
| Ingredient | Quantity | Notes |
|---|---|---|
| All-purpose flour | 3 cups | Spoon and level for accuracy. |
| Granulated sugar | 2 cups | Provides sweetness and moisture. |
| Unsalted butter | 1 cup (2 sticks) | Softened to room temperature for creaming. |
| Large eggs | 4 | Room temperature eggs emulsify better. |
| Whole milk | 1 cup | Room temperature for a smooth batter. |
| Baking powder | 1 tablespoon | For a light and fluffy texture. |
| Vanilla extract | 2 teaspoons | Pure vanilla offers the best flavor. |
| Salt | 1/2 teaspoon | Balances sweetness and enhances flavor. |
| Confectioners’ sugar | 4 cups | For the buttercream frosting. |
| Unsalted butter (for frosting) | 1 cup (2 sticks) | Softened, but not melted. |
| Heavy cream or milk (for frosting) | 3-4 tablespoons | Adjust to desired frosting consistency. |
| Vanilla extract (for frosting) | 1 teaspoon | Essential for classic buttercream flavor. |
| Pinch of salt (for frosting) | Cuts the sweetness slightly. |
Remember, having all your ingredients measured and ready before you start baking makes the process much smoother and more enjoyable. This mise en place approach truly helps ensure a successful and delicious Sweet 16 Birthday Cake.
Substitutions & Variations
This incredible Sweet 16 Birthday Cake recipe offers fantastic flexibility, allowing you to adapt it to dietary needs or simply get creative with flavors. Personalizing this cake is part of the fun, ensuring the birthday celebrant truly feels special. You can easily make this a gluten-free Sweet 16 Birthday Cake by swapping out the all-purpose flour for a good quality 1:1 gluten-free baking flour blend.
Just make sure your chosen blend contains xanthan gum, or add 1/2 teaspoon separately if it doesn’t. Similarly, for a dairy-free option, use a plant-based milk (like almond or oat milk) and a high-quality dairy-free butter alternative for both the cake and the frosting. These simple swaps make the Sweet 16 Birthday Cake accessible to everyone.
Now, let’s talk flavor! To create a Lemon Raspberry Sweet 16 Birthday Cake, simply add the zest of two lemons to the cake batter and a tablespoon of lemon juice to the frosting. You can also spread a thin layer of raspberry jam between the cake layers before frosting.
For a decadent Chocolate Sweet 16 Birthday Cake, replace 1/2 cup of flour with 1/2 cup of unsweetened cocoa powder, and consider adding a teaspoon of instant espresso powder to deepen the chocolate flavor. You can also fold in 1 cup of mini chocolate chips into the batter for an extra textural surprise. An almond-flavored Sweet 16 Birthday Cake is lovely too; just swap out one teaspoon of vanilla extract for almond extract in both the cake and frosting.
Beyond the cake itself, the frosting offers endless possibilities for your Sweet 16 Birthday Cake. While a classic vanilla buttercream is always a hit, you could try a cream cheese frosting for a tangy counterpoint, or even a rich chocolate ganache. Add food coloring to match party themes – vibrant pink, sophisticated teal, or shimmering gold frosting can completely transform the look of your Sweet 16 Birthday Cake.
Sprinkles are a must for any Sweet 16 Birthday Cake, but think about edible glitter, fresh berries, chocolate curls, or even a custom cake topper that reflects the teen’s hobbies or interests. You can also fill the cake with fruit curds, jam, or even whipped cream for an extra layer of deliciousness. The goal is to make this Sweet 16 Birthday Cake uniquely theirs!
After mastering this adaptable Sweet 16 cake, you might be looking for more ways to infuse creativity into your baking. Exploring themed designs can spark further inspiration for your next celebratory confection, ensuring every event has a unique and beautiful dessert, much like the stunning Elegant Ocean Inspired Cakes.
Step-by-Step Instructions
Baking this beautiful Sweet 16 Birthday Cake is a rewarding journey, and by following these simple steps, you’ll achieve a stunning and delicious result. Remember, patience and attention to detail are your best friends in the kitchen.
Note: This video is for demonstration purposes and may use a slightly different method.
1. Prepare Your Pans: First, preheat your oven to 350°F (175°C). Generously grease and flour two 8-inch round cake pans.
You can also line the bottoms with parchment paper for extra assurance against sticking. This crucial step helps ensure your Sweet 16 Birthday Cake layers release cleanly.
2.
Combine Dry Ingredients: In a medium bowl, whisk together the all-purpose flour, baking powder, and salt. Make sure these are thoroughly combined to ensure even leavening throughout your Sweet 16 Birthday Cake. Set this aside.
3. Cream Butter and Sugar: In a large bowl, using an electric mixer, cream together the softened unsalted butter and granulated sugar until light, fluffy, and pale in color. This process incorporates air, which contributes to the cake’s tender texture.
Scrape down the sides of the bowl often.
4. Add Eggs and Vanilla: Beat in the large eggs one at a time, ensuring each egg is fully incorporated before adding the next.
Then, mix in the vanilla extract. The mixture might look slightly curdled at this point, but don’t worry; it will smooth out as you add the dry ingredients.
5.
Alternate Wet and Dry: Gradually add the dry ingredients to the wet mixture, alternating with the room temperature whole milk. Begin and end with the dry ingredients. Start by adding about a third of the flour mixture, mix until just combined, then add half the milk, mix, then another third of the flour, the remaining milk, and finally the last third of the flour.
Mix *only* until just combined after each addition. Do not overmix the batter, as this can lead to a tough cake. This gentle mixing ensures a moist and tender Sweet 16 Birthday Cake.
6. Divide and Bake: Divide the cake batter evenly between your two prepared cake pans. Smooth the tops with a spatula.
Bake for 28-32 minutes, or until a wooden skewer inserted into the center of the cakes comes out clean.
7. Cooling Time: Let the cake layers cool in their pans on a wire rack for about 10-15 minutes.
Then, carefully invert them onto the wire rack to cool completely. Cooling completely is essential before frosting your Sweet 16 Birthday Cake. Warm cake will melt the frosting!
8. Prepare the Buttercream Frosting: While the cakes cool, make your frosting. In a large bowl, cream the softened butter with an electric mixer until very light and fluffy.
Gradually add the confectioners’ sugar, about a cup at a time, mixing well after each addition. Add the vanilla extract and a pinch of salt. Slowly add the heavy cream or milk, a tablespoon at a time, until you reach your desired frosting consistency.
Beat on high speed for a few minutes until the frosting is incredibly light and smooth. This smooth frosting will make decorating your Sweet 16 Birthday Cake much easier.
9.
Assemble and Decorate: Once the cake layers are completely cool, level them with a serrated knife if needed (this creates a flat surface for stacking). Place one cake layer on your serving plate or cake stand. Spread a generous layer of buttercream frosting on top.
Carefully place the second cake layer on top. Apply a thin “crumb coat” of frosting all over the entire cake. This traps any loose crumbs.
Chill the cake in the refrigerator for 15-20 minutes to set the crumb coat. Finally, apply the remaining frosting, decorating your Sweet 16 Birthday Cake as desired with swirls, piping, and sprinkles.
Pro Tips for Success
Baking a magnificent Sweet 16 Birthday Cake is incredibly rewarding, and a few insider tips can truly elevate your results. I’ve learned these tricks over years of baking for my family, and they make a world of difference.
First and foremost, always use room temperature ingredients. This applies to your butter, eggs, and milk. Room temperature butter creams beautifully with sugar, incorporating more air, which gives your Sweet 16 Birthday Cake a light, tender crumb.
Room temperature eggs and milk emulsify better into the batter, preventing curdling and creating a smoother, more cohesive mixture. Planning ahead for this step makes a huge difference!
Another crucial tip: do not overmix the batter. Once you add the flour, mix only until just combined. Overmixing develops the gluten in the flour too much, leading to a tough, dense Sweet 16 Birthday Cake.
We want a tender, melt-in-your-mouth texture, not a rubbery one! Use a spatula for the final folds if you’re worried about overdoing it with the mixer.
Measuring your flour correctly is also vital. Do not scoop flour directly from the bag with your measuring cup. Instead, “spoon and level.” Lightly spoon the flour into your measuring cup until it overflows, then use the back of a knife or a straight edge to level it off. This prevents you from compacting the flour and adding too much, which would result in a dry Sweet 16 Birthday Cake.
For a perfectly even bake, consider rotating your cake pans halfway through the baking time. Ovens often have hot spots, and rotating ensures both sides of your Sweet 16 Birthday Cake layers bake uniformly. And always, always cool your cakes completely before frosting.
This is non-negotiable! If your cakes are even slightly warm, your beautiful buttercream will melt, slide, and create a messy situation. Patience here pays off in a beautifully frosted Sweet 16 Birthday Cake.
Finally, don’t be afraid to embrace the beauty of a homemade look. Your Sweet 16 Birthday Cake doesn’t need to look store-bought perfect. The slightly rustic, lovingly crafted appearance is part of its charm.
Practice your piping, experiment with sprinkles, and most importantly, have fun with the decorating. Even a simple smooth coat of frosting with some festive sprinkles makes a gorgeous Sweet 16 Birthday Cake.

Once you’ve mastered the foundational tips for a perfect Sweet 16 cake, you’ll find these techniques apply to a variety of specialty bakes. Imagine applying your newfound skills to create a charming dessert that conveys warmth and affection, perhaps even a delightful Heart Shaped Ocean Cake.
Storage & Reheating Tips
Proper storage ensures your magnificent Sweet 16 Birthday Cake stays fresh and delicious for as long as possible. Let’s make sure every slice is as wonderful as the first!
Once your Sweet 16 Birthday Cake is fully assembled and frosted, you have a couple of options depending on how quickly it will be enjoyed. If the cake will be eaten within 2-3 days, you can store it uncovered at room temperature in a cool, dry place.
The high sugar content in the frosting acts as a preservative, creating a protective barrier. However, if your home is particularly warm or humid, or if you’ve used any fresh fruit fillings or toppings (like fresh berries), refrigerating the cake is the safer choice.
To refrigerate your Sweet 16 Birthday Cake, it’s best to place it in an airtight cake carrier or under a cake dome. This prevents the cake from absorbing odors from other foods in your fridge and helps keep it from drying out. When ready to serve, always let the refrigerated Sweet 16 Birthday Cake sit at room temperature for at least 30 minutes to an hour before slicing.
This allows the cake and frosting to soften, bringing out their best flavors and textures. A cold cake can taste dense and dry, but a room temperature slice of this Sweet 16 Birthday Cake will be perfectly tender.
For longer storage, or if you have leftover slices of this wonderful Sweet 16 Birthday Cake, freezing is an excellent option. Wrap individual slices tightly in plastic wrap, then again in aluminum foil, or place them in an airtight freezer-safe container. Frozen cake slices can last for up to 2-3 months.
To enjoy a frozen slice, simply unwrap it and let it thaw at room temperature for a few hours. There’s no “reheating” necessary for a cake; it’s all about bringing it back to that perfect serving temperature. This means you can enjoy a little taste of that special Sweet 16 Birthday Cake long after the party has ended!
What to Serve With This Recipe
This spectacular Sweet 16 Birthday Cake is undeniably the star of any celebration, but a well-rounded party spread enhances the entire experience. Think about complementing its sweetness with a balance of flavors and textures.
For beverages, keep it festive and refreshing. Sparkling cider is a fantastic non-alcoholic choice, offering that celebratory pop without the alcohol, perfect for a teen’s birthday. Homemade fruit punch, infused water with cucumber and mint, or even a classic pitcher of iced tea with lemon slices also make excellent accompaniments.
For adults attending, perhaps a light, crisp prosecco or a festive mimosa could be offered to toast the birthday person. The key is to have drinks that cleanse the palate and refresh guests between bites of the rich Sweet 16 Birthday Cake.
When it comes to food, consider a mix of light bites and savory options. Since the Sweet 16 Birthday Cake is rich and sweet, serve appetizers that aren’t too heavy. A colorful fruit platter with seasonal berries, melon, and grapes offers a healthy, refreshing contrast.
Mini quiches, cucumber sandwiches, or bruschetta provide savory elements that balance the sweetness. Small skewers with cherry tomatoes, mozzarella balls, and basil drizzled with balsamic glaze are always a hit. If you’re leaning towards a more substantial meal before the Sweet 16 Birthday Cake, simple pasta salads, sliders, or a build-your-own taco bar allow guests to customize their plates and keep things fun and informal.

Ultimately, the most important “accompaniment” to this Sweet 16 Birthday Cake is the joyful atmosphere, the laughter, and the love shared with friends and family. A memorable toast to the birthday person, followed by the ceremonial cutting of the cake, truly makes the moment special. Everyone will be eagerly awaiting their slice of this incredible Sweet 16 Birthday Cake!
While your Sweet 16 Birthday Cake will undoubtedly be the highlight, thinking about complementary elements can elevate the entire party’s aesthetic. Consider how different design inspirations can tie together your entire theme, much like the enchanting details found in a Water Themed Cake.
FAQs
Can I make this Sweet 16 Birthday Cake ahead of time?
Absolutely! You can certainly prepare parts of your Sweet 16 Birthday Cake in advance. You can bake the cake layers up to two days ahead of time.
Once completely cooled, wrap them tightly in plastic wrap and store them at room temperature. For longer storage (up to two weeks), you can freeze the wrapped cake layers. Thaw them overnight in the refrigerator before decorating.
The buttercream frosting can also be made 2-3 days in advance and stored in an airtight container in the refrigerator. Just let it come to room temperature and give it a good whip with your mixer before frosting your Sweet 16 Birthday Cake.
What if my Sweet 16 Birthday Cake sticks to the pan?
Oh, that’s a common baking woe! The best way to prevent your Sweet 16 Birthday Cake from sticking is to prepare your pans properly. Always grease them generously with butter or a non-stick baking spray, then dust with flour, tapping out the excess.
For extra insurance, you can also line the bottom of the pans with parchment paper cut to size. If your cake still sticks slightly, let it cool in the pan for 10-15 minutes, then run a thin knife around the edges before inverting onto a wire rack. Gently tap the bottom of the pan; sometimes a little nudge is all it takes for your Sweet 16 Birthday Cake to release.
How can I make my Sweet 16 Birthday Cake taste extra special?
To elevate the flavor of your Sweet 16 Birthday Cake, consider a few simple additions. Use pure vanilla extract, or even a vanilla bean paste, for a richer vanilla flavor. You can add a teaspoon of almond extract to the batter for a subtle complexity.
Zesting a lemon or an orange into the batter brightens the taste beautifully. For the frosting, consider adding a hint of cream cheese or a little espresso powder (even with vanilla frosting!) to deepen the flavor without making it taste like coffee. Layering a thin spread of fruit preserves or a lemon curd between the cake layers also adds a wonderful surprise element to your Sweet 16 Birthday Cake.
Is it hard to decorate a Sweet 16 Birthday Cake?
Decorating a Sweet 16 Birthday Cake can seem daunting, but it’s truly not as hard as it looks! The most important step is ensuring your cake is completely cool before you start. Begin with a thin “crumb coat” of frosting all over the cake – this seals in any loose crumbs and creates a smooth base.
Chill the cake for 15-20 minutes, then apply your final, thicker layer of frosting. Don’t worry about perfection; a slightly rustic, homemade look adds charm. Use an offset spatula or a bench scraper for smooth sides.
For impressive touches, simple piping with a star tip around the top and bottom edges, or a generous scattering of colorful sprinkles, can make your Sweet 16 Birthday Cake look professionally done. Just have fun with it!
How do I transport my Sweet 16 Birthday Cake?
Transporting a multi-layered Sweet 16 Birthday Cake requires a bit of planning. If it’s a short distance, a sturdy flat box or a cake carrier is essential. Place a non-slip mat (like a shelf liner) in the bottom of the box or carrier to prevent the cake from sliding.
Drive carefully, avoiding sudden stops or turns. For longer distances or warmer weather, consider chilling the cake thoroughly beforehand to firm up the frosting. You can also place ice packs around the base of the cake carrier (not directly touching the cake) to keep it cool. Always place the cake on a flat surface in your car, like the trunk or the floor, rather than on an angled seat, to ensure your beautiful Sweet 16 Birthday Cake arrives intact.
A Sweet 16 celebration marks a significant milestone in a young person’s life, particularly for girls in the United States and Canada, symbolizing a transition from childhood to young adulthood. The tradition often involves a lavish party, dancing, and a beautifully decorated birthday cake that serves as the centerpiece of the festivities, reflecting the celebrant’s personality and dreams for the future, much like a coming of age ritual.
Nutrition Information (per serving)
Please note: This nutrition information is an estimate based on the ingredients listed and assumes the Sweet 16 Birthday Cake is cut into 16 generous servings. Actual values may vary depending on specific brands, exact measurements, and any substitutions or additions made. This estimate does not include optional decorations or fillings.
| Nutrient | Amount (estimated) |
|---|---|
| Calories | 520 kcal |
| Total Fat | 25 g |
| Saturated Fat | 15 g |
| Cholesterol | 100 mg |
| Sodium | 200 mg |
| Total Carbohydrates | 70 g |
| Dietary Fiber | 1 g |
| Total Sugars | 55 g |
| Protein | 5 g |
Sweet 16 Birthday Cake

A tender, moist, and perfectly sweet classic vanilla cake, this homemade Sweet 16 Birthday Cake is a stunning centerpiece for any celebration. It's designed to be simple for home bakers and highly customizable to reflect the birthday person's unique personality, making it a cherished memory.
- Prep Time: 60 mins
- Cook Time: 30 mins
- Total Time: 3 hours 15 mins
- Yield: 16 servings 1x
- Category: Dessert
- Method: Baking
- Cuisine: American
- Diet: Vegetarian
Ingredients
3 cups All-purpose flour
2 cups Granulated sugar
1 cup Unsalted butter
4 Large eggs
1 cup Whole milk
1 tablespoon Baking powder
2 teaspoons Vanilla extract
0.5 teaspoon Salt
4 cups Confectioners’ sugar
1 cup Unsalted butter (for frosting)
3–4 tablespoons Heavy cream or milk (for frosting)
1 teaspoon Vanilla extract (for frosting)
Pinch Salt (for frosting)
Instructions
- Prepare Your Pans: First, preheat your oven to 350°F (175°C). Generously grease and flour two 8-inch round cake pans. You can also line the bottoms with parchment paper for extra assurance against sticking. This crucial step helps ensure your Sweet 16 Birthday Cake layers release cleanly
- Combine Dry Ingredients: In a medium bowl, whisk together the all-purpose flour, baking powder, and salt. Make sure these are thoroughly combined to ensure even leavening throughout your Sweet 16 Birthday Cake. Set this aside
- Cream Butter and Sugar: In a large bowl, using an electric mixer, cream together the softened unsalted butter and granulated sugar until light, fluffy, and pale in color. This process incorporates air, which contributes to the cake's tender texture. Scrape down the sides of the bowl ofte
- Add Eggs and Vanilla: Beat in the large eggs one at a time, ensuring each egg is fully incorporated before adding the next. Then, mix in the vanilla extract. The mixture might look slightly curdled at this point, but don't worry; it will smooth out as you add the dry ingredients
- Alternate Wet and Dry: Gradually add the dry ingredients to the wet mixture, alternating with the room temperature whole milk. Begin and end with the dry ingredients. Start by adding about a third of the flour mixture, mix until just combined, then add half the milk, mix, then another third of the flour, the remaining milk, and finally the last third of the flour. Mix only until just combined after each addition. Do not overmix the batter, as this can lead to a tough cake. This gentle mixing ensures a moist and tender Sweet 16 Birthday Cake
- Divide and Bake: Divide the cake batter evenly between your two prepared cake pans. Smooth the tops with a spatula. Bake for 28-32 minutes, or until a wooden skewer inserted into the center of the cakes comes out clea
- Cooling Time: Let the cake layers cool in their pans on a wire rack for about 10-15 minutes. Then, carefully invert them onto the wire rack to cool completely. Cooling completely is essential before frosting your Sweet 16 Birthday Cake. Warm cake will melt the frosting!
- Prepare the Buttercream Frosting: While the cakes cool, make your frosting. In a large bowl, cream the softened butter with an electric mixer until very light and fluffy. Gradually add the confectioners' sugar, about a cup at a time, mixing well after each addition. Add the vanilla extract and a pinch of salt. Slowly add the heavy cream or milk, a tablespoon at a time, until you reach your desired frosting consistency. Beat on high speed for a few minutes until the frosting is incredibly light and smooth. This smooth frosting will make decorating your Sweet 16 Birthday Cake much easier
- Assemble and Decorate: Once the cake layers are completely cool, level them with a serrated knife if needed (this creates a flat surface for stacking). Place one cake layer on your serving plate or cake stand. Spread a generous layer of buttercream frosting on top. Carefully place the second cake layer on top. Apply a thin "crumb coat" of frosting all over the entire cake. This traps any loose crumbs. Chill the cake in the refrigerator for 15-20 minutes to set the crumb coat. Finally, apply the remaining frosting, decorating your Sweet 16 Birthday Cake as desired with swirls, piping, and sprinkles
Notes
Always use room temperature butter, eggs, and milk for a lighter, tender crumb and smoother batter.
Do not overmix the batter after adding flour to prevent a tough cake; mix only until just combined.
Measure flour correctly by spooning it into the measuring cup and leveling it off, rather than scooping directly from the bag, to avoid a dry cake.
Rotate cake pans halfway through baking for an even bake, as ovens often have hot spots.
Cool cakes completely before frosting; warm cake will melt the buttercream.
Embrace the homemade look; practice piping and experiment with sprinkles for decoration.
For dietary needs, this recipe can be adapted: swap all-purpose flour for a 1:1 gluten-free baking flour blend (ensure it contains xanthan gum or add 1/2 tsp). For dairy-free, use plant-based milk and dairy-free butter alternatives.
Flavor variations include Lemon Raspberry (lemon zest/juice, raspberry jam), Chocolate (cocoa powder, instant espresso, mini chocolate chips), or Almond (almond extract).
Frosting variations include cream cheese frosting, chocolate ganache, or adding food coloring, edible glitter, fresh berries, chocolate curls, or a custom cake topper.
Store assembled and frosted cake uncovered at room temperature for 2-3 days in a cool, dry place. For longer storage or warm/humid conditions, refrigerate in an airtight carrier and let sit at room temp 30-60 mins before serving.
Freeze individual slices tightly wrapped in plastic and foil for up to 2-3 months; thaw at room temperature for a few hours before enjoying.
To prevent sticking, generously grease and flour pans, or line with parchment paper. If cake sticks, cool 10-15 mins in pan, run a knife around edges, and gently tap to release.
Elevate flavor with pure vanilla extract/paste, almond extract, citrus zest, cream cheese or espresso powder in frosting, or fruit preserves/lemon curd between layers.
Nutrition
- Serving Size: 1 serving
- Calories: 520 kcal
- Sugar: 55 g
- Sodium: 200 mg
- Fat: 25 g
- Saturated Fat: 15 g
- Unsaturated Fat: N/A
- Trans Fat: N/A
- Carbohydrates: 70 g
- Fiber: 1 g
- Protein: 5 g
- Cholesterol: 100 mg