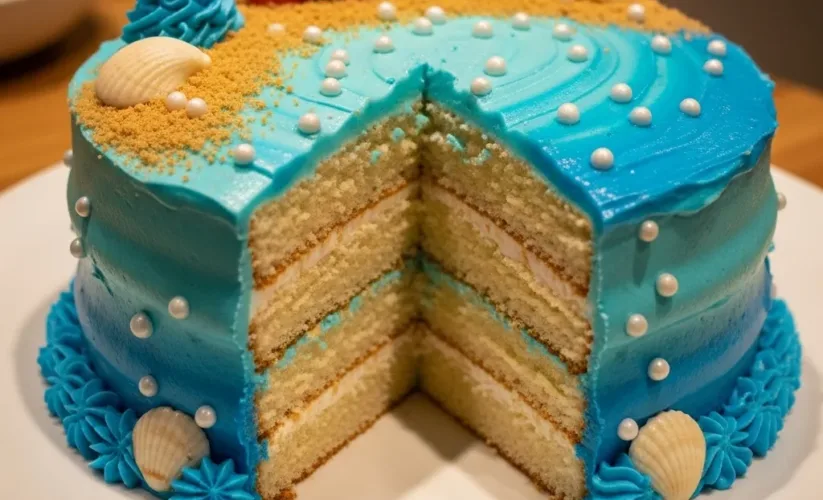
Water Themed Cake
The smell of warm vanilla baking always fills our home with such a cozy, inviting aroma. Just last week, my youngest, Lily, came home from school absolutely buzzing about an “underwater adventure” theme they had for story time. Her eyes sparkled as she described mermaids, playful dolphins, and shimmering blue waters.
That evening, as we brainstormed a fun weekend project, she declared, “Mommy, can we make a water cake? Like the ocean!” My heart swelled; moments like these are why I love being in the kitchen. Creating something beautiful and delicious together, something that sparks joy and imagination, is pure magic.
So, we set out to bake a truly enchanting Water Themed Cake, a delightful creation perfect for any special occasion or just a regular Saturday when you want to make life a little sweeter.
This isn’t just a cake; it’s a centerpiece of smiles, a conversation starter, and a delicious way to bring a little bit of the ocean’s calm beauty right to your table. We poured love into every single step, from mixing the batter to swirling the vibrant blue frosting, making sure our Water Themed Cake captured all the wonder Lily imagined.
Why You’ll Love This Water Themed Cake Recipe
You will adore this Water Themed Cake recipe for so many wonderful reasons. First, it brings an instant splash of joy and creativity to any gathering. Imagine the gasps of delight when you unveil this beautiful creation!
Beyond its stunning visual appeal, this Water Themed Cake is incredibly versatile. You can adapt the colors, decorations, and even the cake flavor to suit your specific occasion or personal taste. As a mom of three, I always look for recipes that are achievable yet impressive, and this one perfectly fits the bill.
It’s simple enough for even beginner bakers to tackle with confidence, yet elegant enough to be the star of a birthday party or a summer potluck. Furthermore, the light, tender crumb of the cake combined with the creamy, dreamy buttercream frosting makes for an irresistible combination that everyone will rave about. It’s a comforting classic with a playful, imaginative twist.
This isn’t just baking; it’s creating an edible piece of art that tastes as good as it looks. Making a homemade Water Themed Cake also offers the unique satisfaction of knowing exactly what ingredients go into your family’s treats.
Ingredients You’ll Need

Gathering your ingredients is the first exciting step towards creating this magnificent Water Themed Cake. Each component plays a crucial role in developing the perfect texture and flavor.
| Ingredient | Quantity | Notes |
|---|---|---|
| All-purpose flour | 2 ½ cups | Sifted for a lighter cake. |
| Granulated sugar | 1 ¾ cups | Sweetens and tenderizes the cake. |
| Baking powder | 1 tablespoon | Ensures a beautiful rise. |
| Salt | ½ teaspoon | Balances sweetness and enhances flavor. |
| Unsalted butter | 1 cup (2 sticks) | Softened, for richness and tender crumb. |
| Large eggs | 4 | Room temperature, for better emulsion. |
| Whole milk | 1 cup | Room temperature, adds moisture and tenderness. |
| Vanilla extract | 2 teaspoons | Pure vanilla for the best flavor. |
| Blue food coloring | Gel variety preferred | For varying shades of blue frosting. |
| Powdered sugar | 6-8 cups | For the buttercream frosting. |
| Unsalted butter | 1 ½ cups (3 sticks) | Softened, for the buttercream frosting. |
| Heavy cream or milk | 4-6 tablespoons | For the buttercream, adjusts consistency. |
| Vanilla extract | 1 teaspoon | For the buttercream. |
| Edible pearls | Optional | For “bubbles” decoration. |
| Crushed graham crackers | Optional | For a “sand” effect. |
| Candy fish/seashells | Optional | For ocean-themed decorations. |
Substitutions & Variations
Flexibility is key in my kitchen, especially with three little ones! This Water Themed Cake recipe is wonderfully adaptable. If you don’t have all-purpose flour, you can easily use cake flour for an even finer crumb, though you might need to adjust the liquid slightly.
For a dairy-free option, substitute plant-based milk (almond, soy, or oat work well) and a good quality dairy-free butter alternative for both the cake and the frosting. Make sure your butter alternative is suitable for baking and frosting. You can also experiment with different cake flavors for your Water Themed Cake.
A lemon zest in the batter would add a bright, refreshing twist, or you could opt for a coconut extract to enhance the tropical feel. For a chocolate version, try a blue ombre chocolate frosting on a classic chocolate cake. Instead of traditional vanilla, almond extract or even a touch of mint extract could create a unique flavor profile for your amazing Water Themed Cake.
When it comes to coloring, natural food colorings made from spirulina or butterfly pea flower can achieve beautiful blue hues without artificial dyes. If you want to skip the piping, simply smooth the frosting on the cake and use a fork to create wave-like textures. For those avoiding artificial colors, a simple white frosting with ocean-themed sprinkles or naturally colored candies can still convey the theme beautifully. Remember, this Water Themed Cake is your canvas!
Such flexibility allows for diverse dietary needs and creative variations. If you’re looking to create an equally stunning dessert with a specific visual appeal, you might also be inspired by this beautiful Ocean Aesthetic Birthday Cake.
Step-by-Step Instructions
Note: This video is for demonstration purposes and may use a slightly different method.
Creating this stunning Water Themed Cake is a joyous process. Follow these detailed steps for a perfect result:
1. Prepare Your Pans: Preheat your oven to 350°F (175°C). Grease and flour two 8-inch round cake pans or line them with parchment paper circles.
This prevents sticking and ensures easy removal of your lovely cake layers.
2. Combine Dry Ingredients: In a large bowl, whisk together the sifted all-purpose flour, granulated sugar, baking powder, and salt.
Make sure these ingredients are thoroughly combined to ensure an even rise and flavor distribution throughout your Water Themed Cake.
3. Cream Butter and Eggs: In a separate, larger bowl, or the bowl of a stand mixer, cream the softened unsalted butter until it becomes light and fluffy, about 2-3 minutes.
Gradually add the room temperature eggs, one at a time, beating well after each addition. Scrape down the sides of the bowl as needed. This step incorporates air, making your cake tender.
4. Alternate Wet and Dry: Add about one-third of the dry ingredients to the butter mixture, mixing on low speed until just combined. Next, pour in half of the room temperature whole milk and vanilla extract, mixing until smooth.
Repeat with another third of the dry ingredients, then the remaining milk, and finally the last of the dry ingredients. Mix until *just* combined; overmixing develops gluten and can lead to a tough cake.
5.
Divide and Bake: Divide the cake batter evenly between your two prepared cake pans. Smooth the tops with a spatula. Bake for 30-35 minutes, or until a wooden skewer inserted into the center of the cakes comes out clean.
Baking times can vary, so keep an eye on your Water Themed Cake layers.
6. Cool Completely: Remove the cakes from the oven and let them cool in their pans on a wire rack for about 10-15 minutes.
Then, invert them onto the wire rack to cool completely. Cooling thoroughly prevents the frosting from melting.
7.
Make the Buttercream Frosting: While the cakes cool, prepare your buttercream. In a large bowl, beat the softened unsalted butter until creamy. Gradually add the powdered sugar, one cup at a time, mixing well after each addition.
Once all the sugar is incorporated, add the vanilla extract and 4 tablespoons of heavy cream or milk. Beat on medium-high speed for 3-5 minutes until the frosting is light, fluffy, and smooth. Add more cream or milk, one tablespoon at a time, if you need a thinner consistency.
8. Color the Frosting: Divide the buttercream into 2-3 bowls. Leave one bowl white or a very light blue.
In the other bowls, add varying amounts of blue gel food coloring to create different shades of blue (light blue, medium blue, dark blue). Mix each bowl well. These shades will create the beautiful ombré effect for your Water Themed Cake.
9. Assemble and Frost: Once the cakes are completely cool, level them if necessary using a serrated knife. Place one cake layer on your serving platter or cake stand.
Spread a generous layer of your darkest blue frosting on top. Place the second cake layer on top. Apply a thin “crumb coat” of the medium blue frosting all over the top and sides of the cake.
This traps any loose crumbs. Chill the cake in the refrigerator for 15-20 minutes.
10.
Decorate Your Water Themed Cake: Apply the remaining frosting in your desired ombré pattern, or use different shades to pipe waves. Start with the darkest blue at the bottom, moving to lighter shades towards the top. Smooth with an offset spatula or bench scraper.
Finally, decorate with edible pearls for bubbles, crushed graham crackers for sand, or candy fish to bring your Water Themed Cake to life.
11. Chill and Serve: Chill your decorated Water Themed Cake for at least 30 minutes before slicing and serving. This helps the frosting set and makes for cleaner cuts.
Pro Tips for Success

Achieving a bakery-worthy Water Themed Cake involves a few helpful tricks I’ve learned over the years. First and foremost, always use room temperature ingredients for your cake batter. This ensures they emulsify properly, creating a smooth, homogenous batter and a tender, even crumb.
Cold eggs or butter can lead to a lumpy batter and a denser cake. Similarly, ensure your milk is at room temperature. When mixing, avoid overmixing the batter once you add the flour.
Overmixing develops gluten, which results in a tough, chewy cake. Mix only until the ingredients are just combined.
For the buttercream, sifting your powdered sugar is a game-changer. It prevents lumps and gives you an incredibly smooth, silky frosting that spreads beautifully. When coloring the frosting for your Water Themed Cake, use gel food coloring instead of liquid.
Gel colors are more concentrated, give vibrant hues without watering down your frosting, and you need less of it. Start with a tiny amount and gradually add more until you reach your desired shade. Remember, colors can deepen slightly as they sit.
To achieve that perfect ombré effect for your Water Themed Cake, apply your different shades of blue frosting in bands around the cake’s sides, then use a bench scraper or offset spatula to smooth and blend them together. This technique creates a seamless transition between colors.
Don’t rush the cooling process. A warm cake will melt your beautiful buttercream, leading to a frustrating mess. Allow your cake layers to cool completely on a wire rack before attempting to frost them.
To get perfectly flat cake layers, you can use baking strips around your cake pans, or simply level cooled layers with a serrated knife. Finally, if you’re nervous about decorating, start simple! A smooth blue frosting with some edible pearls and a few candy fish creates a lovely Water Themed Cake without complex piping. Practice makes perfect, and every cake you make is a step in your baking journey!
Mastering these techniques ensures your cake has the perfect texture and rise every time. For another vibrant creation that benefits from careful preparation, explore the delightful Blue Sea Cake Recipe.
Storage & Reheating Tips
Proper storage ensures your beautiful Water Themed Cake stays fresh and delicious for as long as possible. Once frosted, the cake is best stored in an airtight cake carrier or under a cake dome at room temperature for up to 2 days. If your kitchen is particularly warm, or if your frosting contains fresh cream cheese (not in this recipe, but for variations), refrigeration becomes essential.
When refrigerating your Water Themed Cake, always cover it tightly with plastic wrap to prevent it from drying out or absorbing refrigerator odors. It will stay fresh for up to 5 days in the fridge.
Before serving a refrigerated Water Themed Cake, allow it to sit at room temperature for at least 30 minutes to an hour. This lets the buttercream soften slightly, bringing out its best flavor and texture. Nobody wants to eat a hard, cold cake!
For longer storage, you can freeze individual slices or the entire Water Themed Cake (unfrosted layers freeze best). To freeze, wrap individual slices or unfrosted layers tightly in plastic wrap, then an additional layer of aluminum foil. Frozen cake layers can last for up to 2-3 months.
Thaw them overnight in the refrigerator before bringing to room temperature and frosting. Frosted cake can also be frozen, but the texture of the frosting may change slightly upon thawing. Always enjoy your delightful Water Themed Cake when it’s at its peak freshness!
What to Serve With This Recipe

This enchanting Water Themed Cake is already a showstopper, but pairing it with the right accompaniments can elevate the entire experience. For a fun, kid-friendly party, think about complementing the ocean theme. A vibrant fruit salad featuring blueberries, grapes, and kiwi would echo the colors of the sea and offer a refreshing contrast to the sweet cake. You could also serve “ocean water” punch made with blue Hawaiian Punch, lemon-lime soda, and gummy fish.
For a more elegant gathering, consider serving small cups of panna cotta or a light sorbet alongside slices of your beautiful Water Themed Cake. The creamy texture of panna cotta or the icy tartness of sorbet provides a delightful palate cleanser. A simple vanilla bean ice cream or a scoop of homemade whipped cream also pairs wonderfully, adding another layer of creamy indulgence without overpowering the delicate flavors of the Water Themed Cake.
To complete the experience, offer a selection of beverages. Iced tea with lemon, sparkling lemonade, or even a crisp white wine for adult guests would all be excellent choices. This Water Themed Cake truly shines when served as the grand finale of a lovely meal. Remember, presentation matters, so arrange your plates with care, ensuring each guest receives a beautiful slice of your homemade masterpiece.
Thoughtful pairings transform a cake into a truly immersive experience, perfect for setting a festive mood. If you’re planning a special celebration, consider the full party potential with an Ocean Themed Birthday Cake.
FAQs
How can I make my Water Themed Cake layers flat?
For perfectly flat layers, you can use “baking strips” soaked in water around your cake pans. These help the cakes bake more evenly. Alternatively, after your cakes cool completely, use a long serrated knife to carefully level any domed tops. You can trim off the top to create a flat surface, ensuring your Water Themed Cake stacks beautifully.
Can I make the Water Themed Cake ahead of time?
Absolutely! You can bake the cake layers up to 2 days in advance. Wrap them tightly in plastic wrap and store at room temperature, or freeze them for longer storage.
The buttercream frosting can also be made 2-3 days ahead and stored in an airtight container in the refrigerator. Just let it come to room temperature and re-whip it for a few minutes before frosting your Water Themed Cake.
What kind of blue food coloring works best for a Water Themed Cake?
Gel food coloring is highly recommended. It provides intense, vibrant colors with only a small amount, without adding excess liquid to your frosting. Brands like Wilton or Americolor offer excellent gel colors that work perfectly for achieving those beautiful ocean hues on your Water Themed Cake. Liquid food coloring can thin out your frosting and produce less vibrant results.
How do I create a beautiful ombré effect on my Water Themed Cake?
To create an ombré effect, divide your frosting into several bowls and color each bowl a progressively darker shade of blue. Apply the darkest shade to the bottom of the cake, the next shade above it, and so on, until the lightest shade is at the top. Use an offset spatula or a bench scraper to smooth and gently blend the colors together, creating a beautiful gradient for your stunning Water Themed Cake.
What other decorations can I use for my Water Themed Cake?
Beyond edible pearls and candy fish, you can get creative! Crushed blue or green candy can resemble sea glass. You can also use small toy marine animals (just ensure they are food-safe and clean) placed on top.
Piped waves, using a star tip, can add texture. For a beach look, add brown sugar or crushed graham crackers around the base for “sand” on your Water Themed Cake.
Is this Water Themed Cake suitable for beginners?
Yes, this recipe is very approachable for beginners. The cake itself is a simple vanilla sponge, and the decorating techniques are designed to be forgiving. Focus on getting the cake layers baked evenly and the frosting smooth.
The joy of creating a themed cake lies in the effort and love you put in, not necessarily perfection. You can definitely make a fantastic Water Themed Cake even as a novice.
Water-themed cakes are a popular choice for celebrations, particularly for children’s birthdays or summer parties, as they evoke images of oceans, mermaids, and aquatic life. These elaborate designs often involve intricate sugar work, colored frosting, and edible decorations, showcasing a significant aspect of cake decorating and confectionery art.
Nutrition Information (per serving)
Please note that these values are estimates and can vary based on specific brands, exact measurements, and chosen substitutions. This information is provided for general guidance for your homemade Water Themed Cake.
| Nutrient | Amount (Approx.) |
|---|---|
| Calories | 450 kcal |
| Total Fat | 22g |
| Saturated Fat | 14g |
| Cholesterol | 100mg |
| Sodium | 200mg |
| Total Carbohydrates | 60g |
| Dietary Fiber | 1g |
| Total Sugars | 45g |
| Protein | 5g |
Water Themed Cake

This enchanting Water Themed Cake is a delightful creation perfect for any special occasion or just a regular Saturday, designed to fill your home with a cozy, inviting aroma. It's a centerpiece of smiles, a conversation starter, and a delicious way to bring a little bit of the ocean's calm beauty right to your table, capturing all the wonder and joy you'd imagine.
- Prep Time: 1 hour
- Cook Time: 35 mins
- Total Time: 3 hours 45 mins
- Yield: 16 servings 1x
- Category: Dessert
- Method: Baking
- Cuisine: American
- Diet: Standard
Ingredients
2 ½ cups All-purpose flour
1 ¾ cups Granulated sugar
1 tablespoon Baking powder
½ teaspoon Salt
1 cup Unsalted butter
4 Large eggs
1 cup Whole milk
2 teaspoons Vanilla extract
Gel variety Blue food coloring
6–8 cups Powdered sugar
1 ½ cups Unsalted butter
4–6 tablespoons Heavy cream or milk
1 teaspoon Vanilla extract
Optional Edible pearls
Optional Crushed graham crackers
Optional Candy fish/seashells
Instructions
- Preheat your oven to 350°F (175°C). Grease and flour two 8-inch round cake pans or line them with parchment paper circles. This prevents sticking and ensures easy removal of your lovely cake layers
- In a large bowl, whisk together the sifted all-purpose flour, granulated sugar, baking powder, and salt. Make sure these ingredients are thoroughly combined to ensure an even rise and flavor distribution throughout your Water Themed Cake
- In a separate, larger bowl, or the bowl of a stand mixer, cream the softened unsalted butter until it becomes light and fluffy, about 2-3 minutes. Gradually add the room temperature eggs, one at a time, beating well after each addition. Scrape down the sides of the bowl as needed. This step incorporates air, making your cake tender
- Add about one-third of the dry ingredients to the butter mixture, mixing on low speed until just combined. Next, pour in half of the room temperature whole milk and vanilla extract, mixing until smooth. Repeat with another third of the dry ingredients, then the remaining milk, and finally the last of the dry ingredients. Mix until *just* combined; overmixing develops gluten and can lead to a tough cake
- Divide the cake batter evenly between your two prepared cake pans. Smooth the tops with a spatula. Bake for 30-35 minutes, or until a wooden skewer inserted into the center of the cakes comes out clean. Baking times can vary, so keep an eye on your Water Themed Cake layers
- Remove the cakes from the oven and let them cool in their pans on a wire rack for about 10-15 minutes. Then, invert them onto the wire rack to cool completely. Cooling thoroughly prevents the frosting from melting
- While the cakes cool, prepare your buttercream. In a large bowl, beat the softened unsalted butter until creamy. Gradually add the powdered sugar, one cup at a time, mixing well after each addition. Once all the sugar is incorporated, add the vanilla extract and 4 tablespoons of heavy cream or milk. Beat on medium-high speed for 3-5 minutes until the frosting is light, fluffy, and smooth. Add more cream or milk, one tablespoon at a time, if you need a thinner consistency
- Divide the buttercream into 2-3 bowls. Leave one bowl white or a very light blue. In the other bowls, add varying amounts of blue gel food coloring to create different shades of blue (light blue, medium blue, dark blue). Mix each bowl well. These shades will create the beautiful ombré effect for your Water Themed Cake
- Once the cakes are completely cool, level them if necessary using a serrated knife. Place one cake layer on your serving platter or cake stand. Spread a generous layer of your darkest blue frosting on top. Place the second cake layer on top. Apply a thin "crumb coat" of the medium blue frosting all over the top and sides of the cake. This traps any loose crumbs. Chill the cake in the refrigerator for 15-20 minutes
- Apply the remaining frosting in your desired ombré pattern, or use different shades to pipe waves. Start with the darkest blue at the bottom, moving to lighter shades towards the top. Smooth with an offset spatula or bench scraper. Finally, decorate with edible pearls for bubbles, crushed graham crackers for sand, or candy fish to bring your Water Themed Cake to life
- Chill your decorated Water Themed Cake for at least 30 minutes before slicing and serving. This helps the frosting set and makes for cleaner cuts
Notes
Always use room temperature ingredients for your cake batter to ensure proper emulsification and a tender, even crumb.
Avoid overmixing the batter once flour is added to prevent a tough, chewy cake.
Sift powdered sugar for the buttercream to prevent lumps and achieve a smooth, silky frosting.
Use gel food coloring for vibrant hues without watering down the frosting; start with a tiny amount.
For the ombré effect, apply frosting in bands and smooth with a bench scraper or offset spatula.
Allow cake layers to cool completely on a wire rack before frosting to prevent melting.
Store frosted cake in an airtight carrier at room temperature for up to 2 days, or refrigerated for up to 5 days, covered tightly. Before serving a refrigerated cake, let it sit at room temperature for 30 minutes to an hour to soften the buttercream.
Nutrition
- Serving Size: 1 slice
- Calories: 450 kcal
- Sugar: 45g
- Sodium: 200mg
- Fat: 22g
- Saturated Fat: 14g
- Carbohydrates: 60g
- Fiber: 1g
- Protein: 5g
- Cholesterol: 100mg